Grphql Tutorial 3
by 김지운
들어가며
Graphql Tutorial 1, Graphql Tutorial 2 에서 Graphql이 어떤건지 알아봤다.
이번에는 기본적인 User의 CRUD들을 해보도록 한다.
nodemailer와 Gmail 그리고 JWT를 이용하여 회원가입 절차를 구현하고
회원탈퇴, 로그인, 로그아웃, 회원정보 수정 까지 해보도록 하겠다.
지난 Graphql Tutorial 2에서 작성했던 package.json에 몇개를 더 추가하도록 한다.
package.json
{
  "name": "graphql",
  "version": "0.0.0",
  "description": "using vs code project",
  "main": "index.js",
  "engines": {
    "node": "^8.9.4",
    "npm": "^5.6.0"
  },
  "scripts": {
    "test": "echo \"Error: no test specified\" && exit 1",
    "build": "tsc",
    "start": "node ./dist/index.js"
  },
  "devDependencies": {
    "@types/express": "^4.16.0",
    "@types/nodemailer": "^4.6.5"
  },
  "dependencies": {
    "apollo-server-express": "^2.3.1",
    "express": "4.16.0",
    "reflect-metadata": "^0.1.12",
    "type-graphql": "^0.16.0",
    "typedi": "^0.8.0",
    "typescript": "3.2.2",
    "nodemailer": "^5.0.0",
    "mongoose": "^5.4.2",
    "dotenv": "^6.2.0"
  },
  "keywords": [
    "vs"
  ],
  "author": "kishe56@gmail.com",
  "license": "MIT"
}
mongoose 와 dotenv를 추가하였다.
mongoose는 워낙 유명하고 다른 포스팅에서도 내용이 있으니 설명을 따로 하지 않겠다.
혹시 모른더라도 앞으로 작성할 예제에서 사용하는것만 봐도 어느정도 알 수 있을것이다.
dotenv 는 프로그램 실행에 필요한 값들을 환경변수로 가져올 때 많이 사용하는 모듈이다.
기본세팅은 프로젝트의 루트에 있는 .env 파일에 있는 값을 가지고 온다.
일단 프로젝트의 루트에 .env 파일을 생성한다.
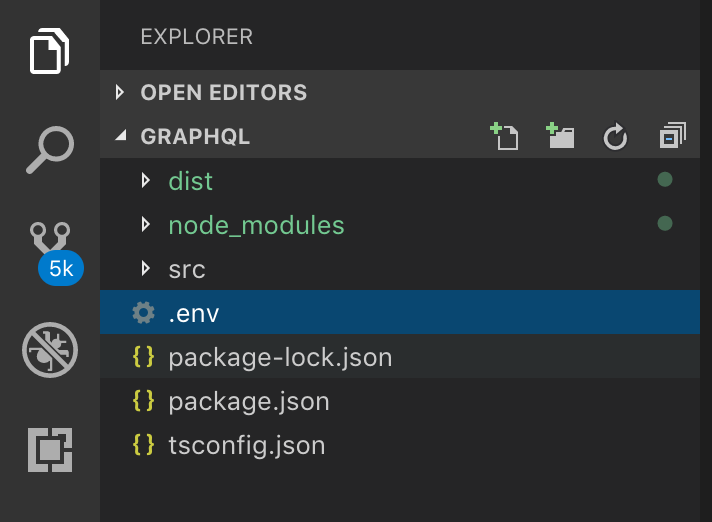
그리고 .env에는 다음과 같이 작성하도록 한다. 참고로 <와>는 지우고 본인의 정보를 넣어준다.
MONGOURL = mongodb://<your id>:<your password>@<your host>/<your dbname>
GMAIL_ID = <your gmail id>
GMAIL_CLIENTID = <your gmail client id>
GMAIL_CLIENT_SECRET = <your gmail client secret>
GMAIL_ACCESS_TOKEN = <your gmail access token>
GMAIL_REFRESH_TOKEN = <your gmail refresh token>
이렇게 작성한 .env 파일은 코드 상에서 다음과 같이 사용할 수 있다.
dotenv 사용예시
import dotenv from 'dotenv'
dotenv.config()

console.log(process.env.MONGOURL)
console.log(process.env.GMAIL_ID)
console.log(process.env.GMAIL_CLIENT_ID)
console.log(process.env.GMAIL_CLIENT_SECRET)
console.log(process.env.GMAIL_ACCESS_TOKEN)
console.log(process.env.GMAIL_REFRESH_TOKEN)
.env에 작성한 변수들은 사용할 곳에서 dotenv 모듈을 로드하고 dotenv.config()를 호출해주면
process.env 에 들어가게 된다. 사용하는 이유는 코드상에 하드코딩되면 껄끄로운 값들 혹은 실행시 argument로 전달해줘야할 값들을
관리 및 process.env에 할당하는 용도로 사용된다.
MONGOURL에 들어갈 MongoDB 접속 URL은 사용할 DB가 URL을 적는다.
이 부분은 잘 모르겠다면 이전에 작성했던 mongodb-connect 포스팅을 참고하도록한다.
그 다음으로 GAMIL_ID, GMAIL_CLIENT_ID, GMAIL_CLIENT_SECRET, GMAIL_ACCESS_TOKEN, GMAIL_REFRESH_TOKEN 의 경우는 지금부터 설명한다.
우리가 작성할 User API에서 Gmail 서비스를 이용하여 인증 메일등을 보내는 것을 작성할것인데 그에 필요한 정보들이다.
email을 보내는데는 nodemailer 모듈을 이용할 것이고 해당 모듈에 지금 작성한 정보들을 제공할 것이다.
일단 Gmail 계정이 필요한데 기존에 구글계정이 있다면 그걸 이용하도록 한다.
일단 아래 링크를 새창에서 열도록 한다.
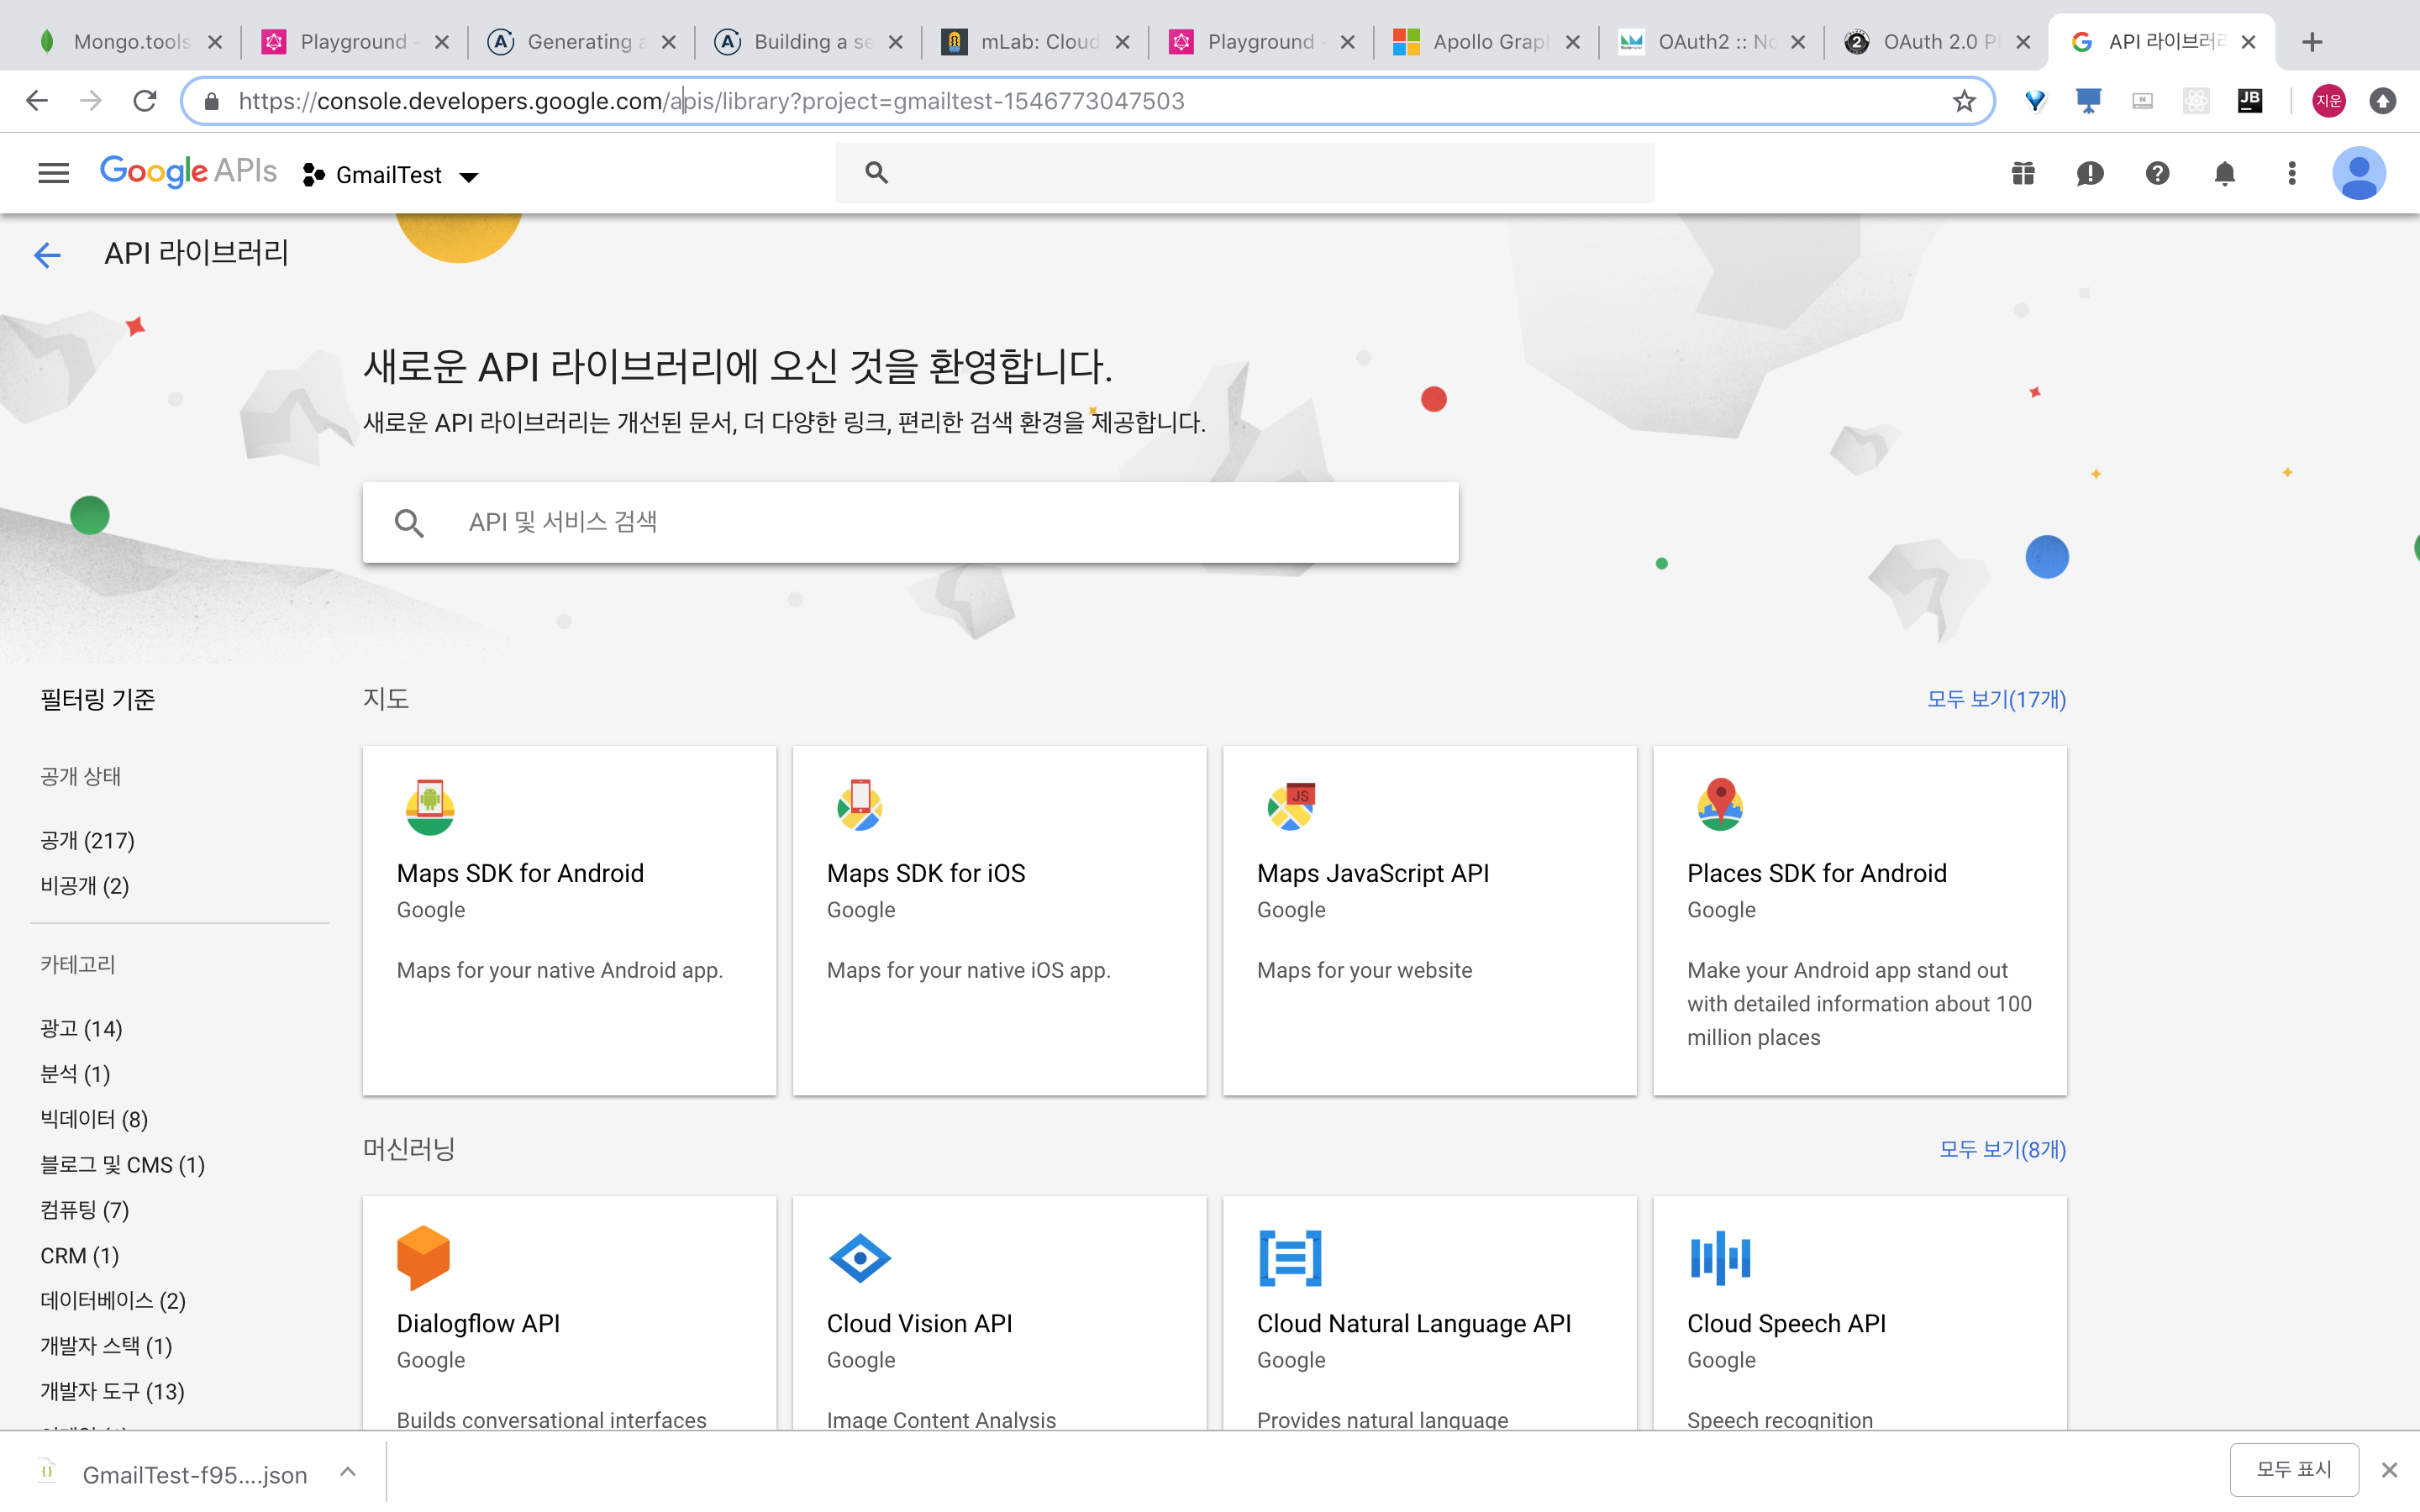
구글 개발자 콘솔 : https://console.developers.google.com
구글 개발자 콘솔은 구글에서 제공하는 여러 서비스들에 대한 사용 및 관리에 대한 기능을 제공하는 곳이다.
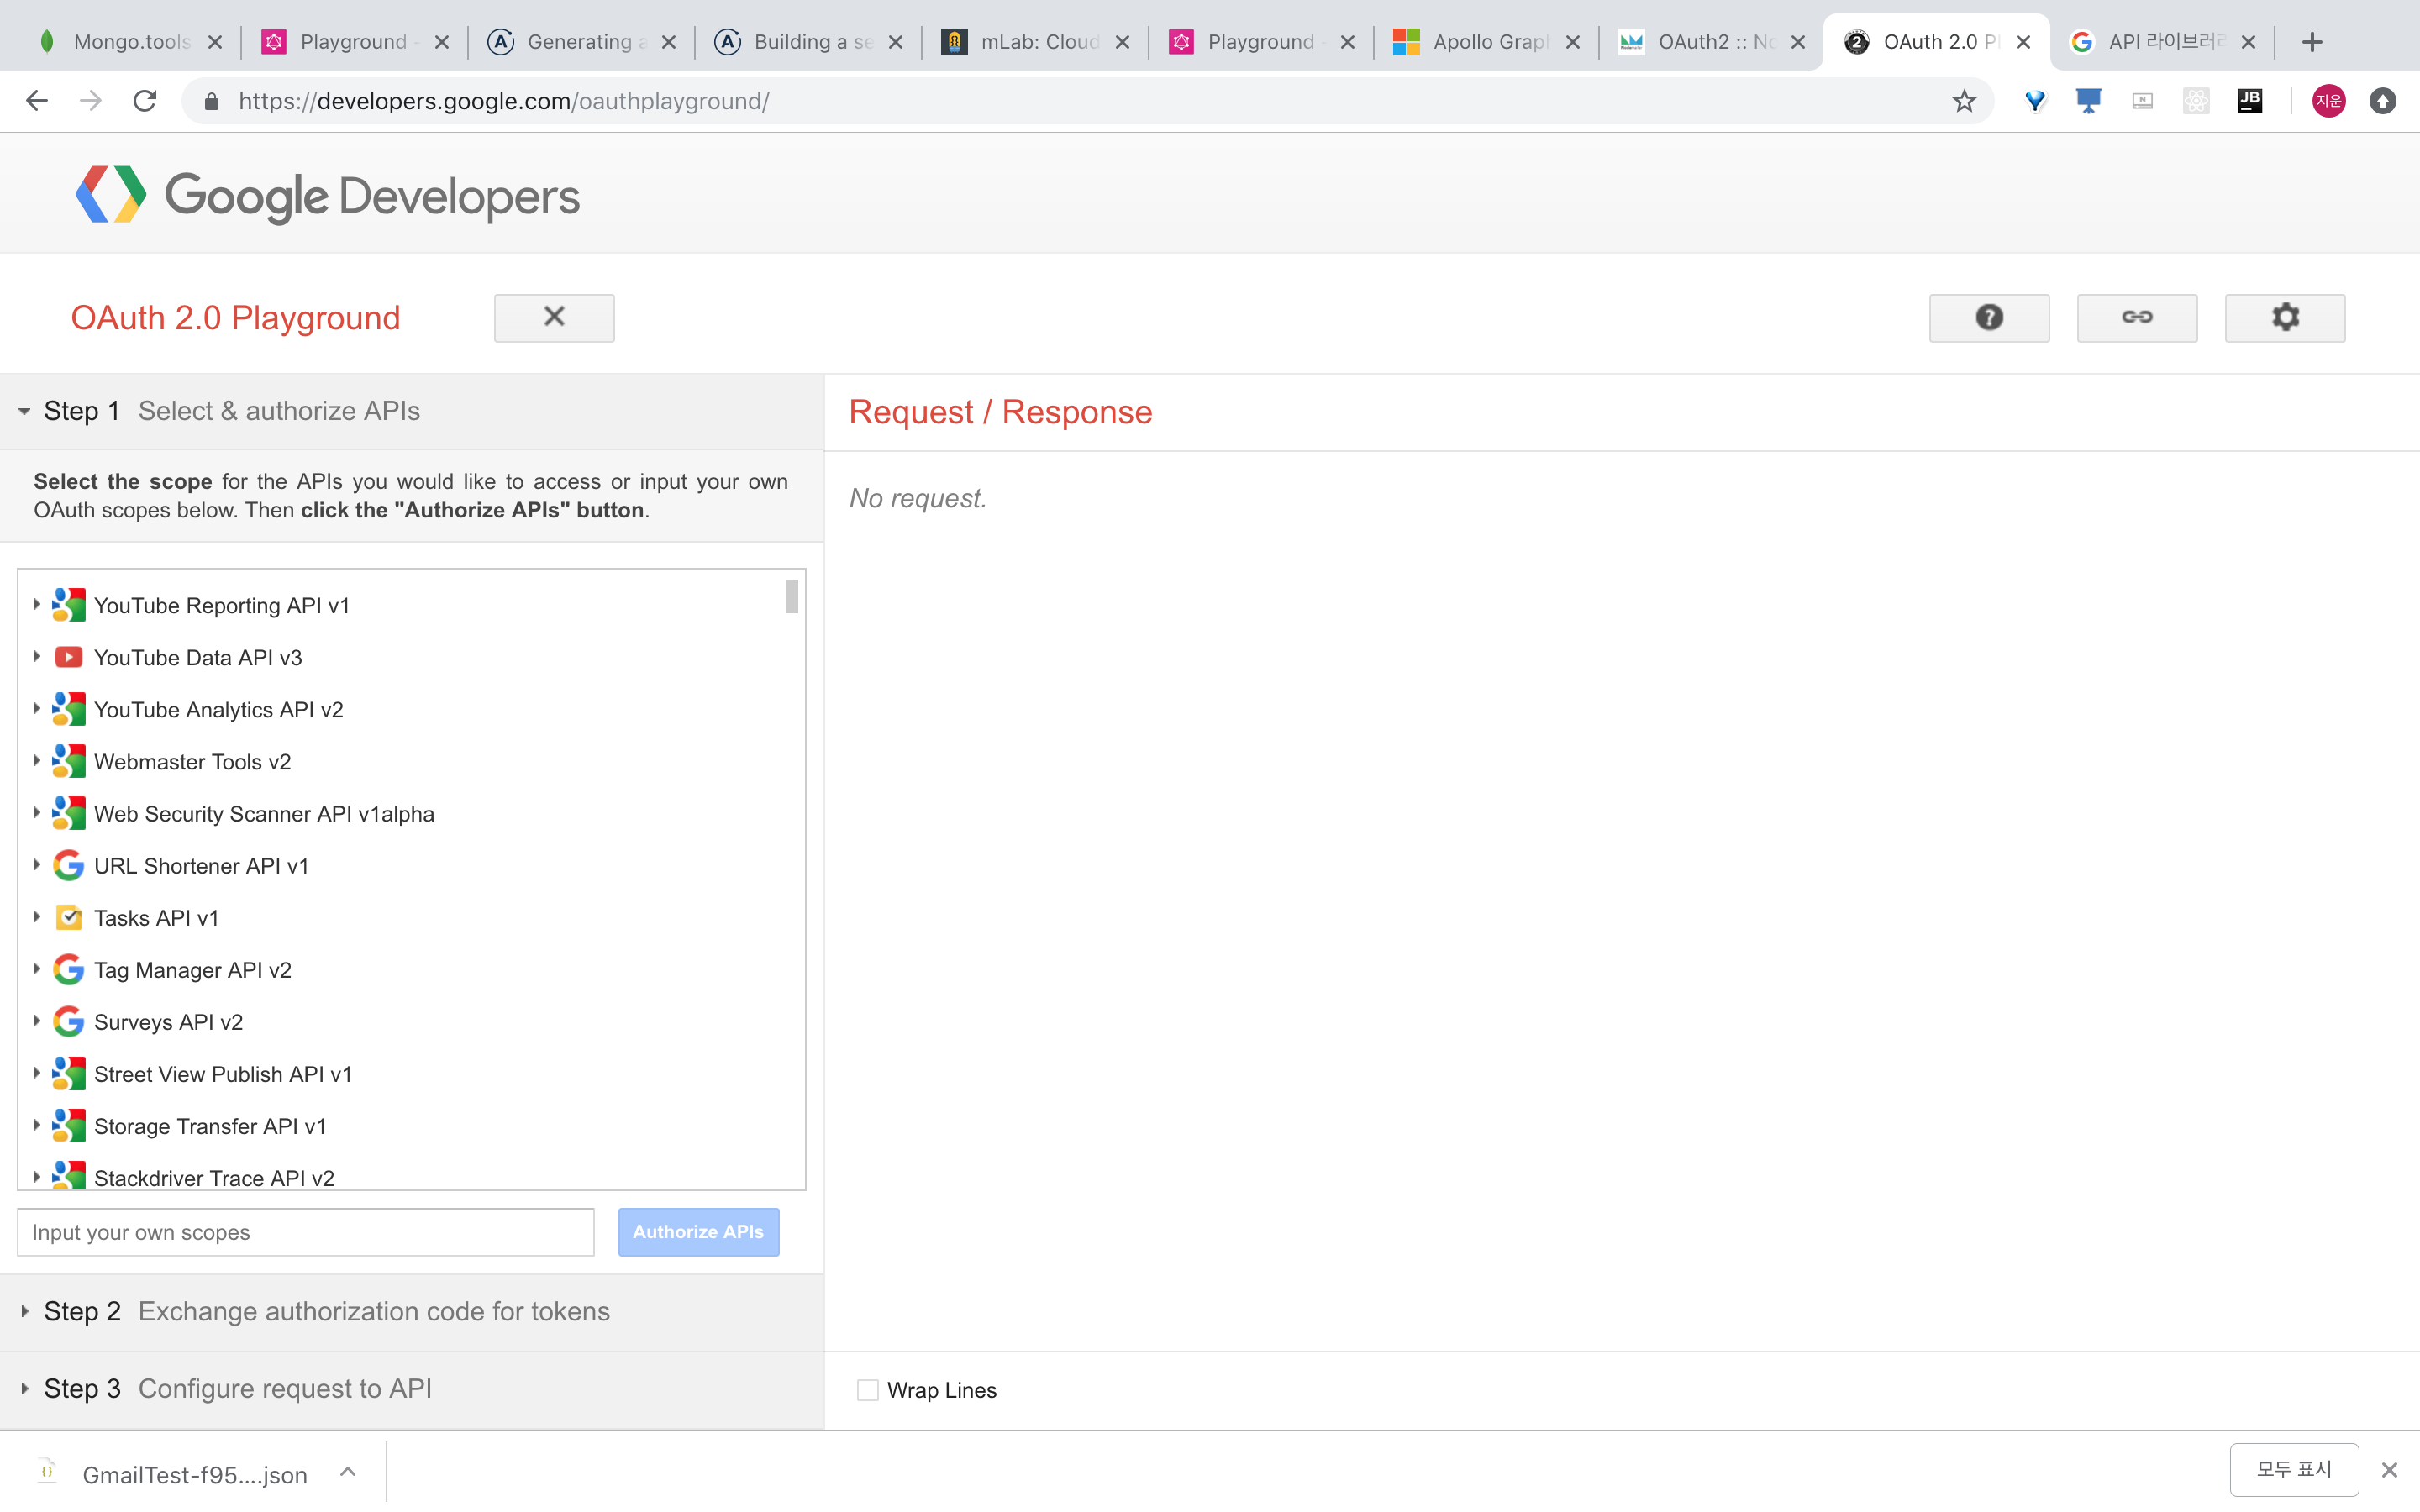
그리고 창을 하나 더 열어놓도록 할건데 구글 OAuth playground 이다.
이곳에선 oauth를 이용하여 api 호출등을 해볼 수 있는데 여기서 access-token, refresh-token을 발급 받을 것이다.
각 창은 다음과 같이 생겼을 것이다.(2018.1.12 기준)
구글 개발자 콘솔 화면
구글 OAuth playground 화면
첫번째로 구글 개발자 콘솔에서 우리가 사용할 Gmail을 찾는다. 그럼 다음과 같은 화면을 볼 수 있다.
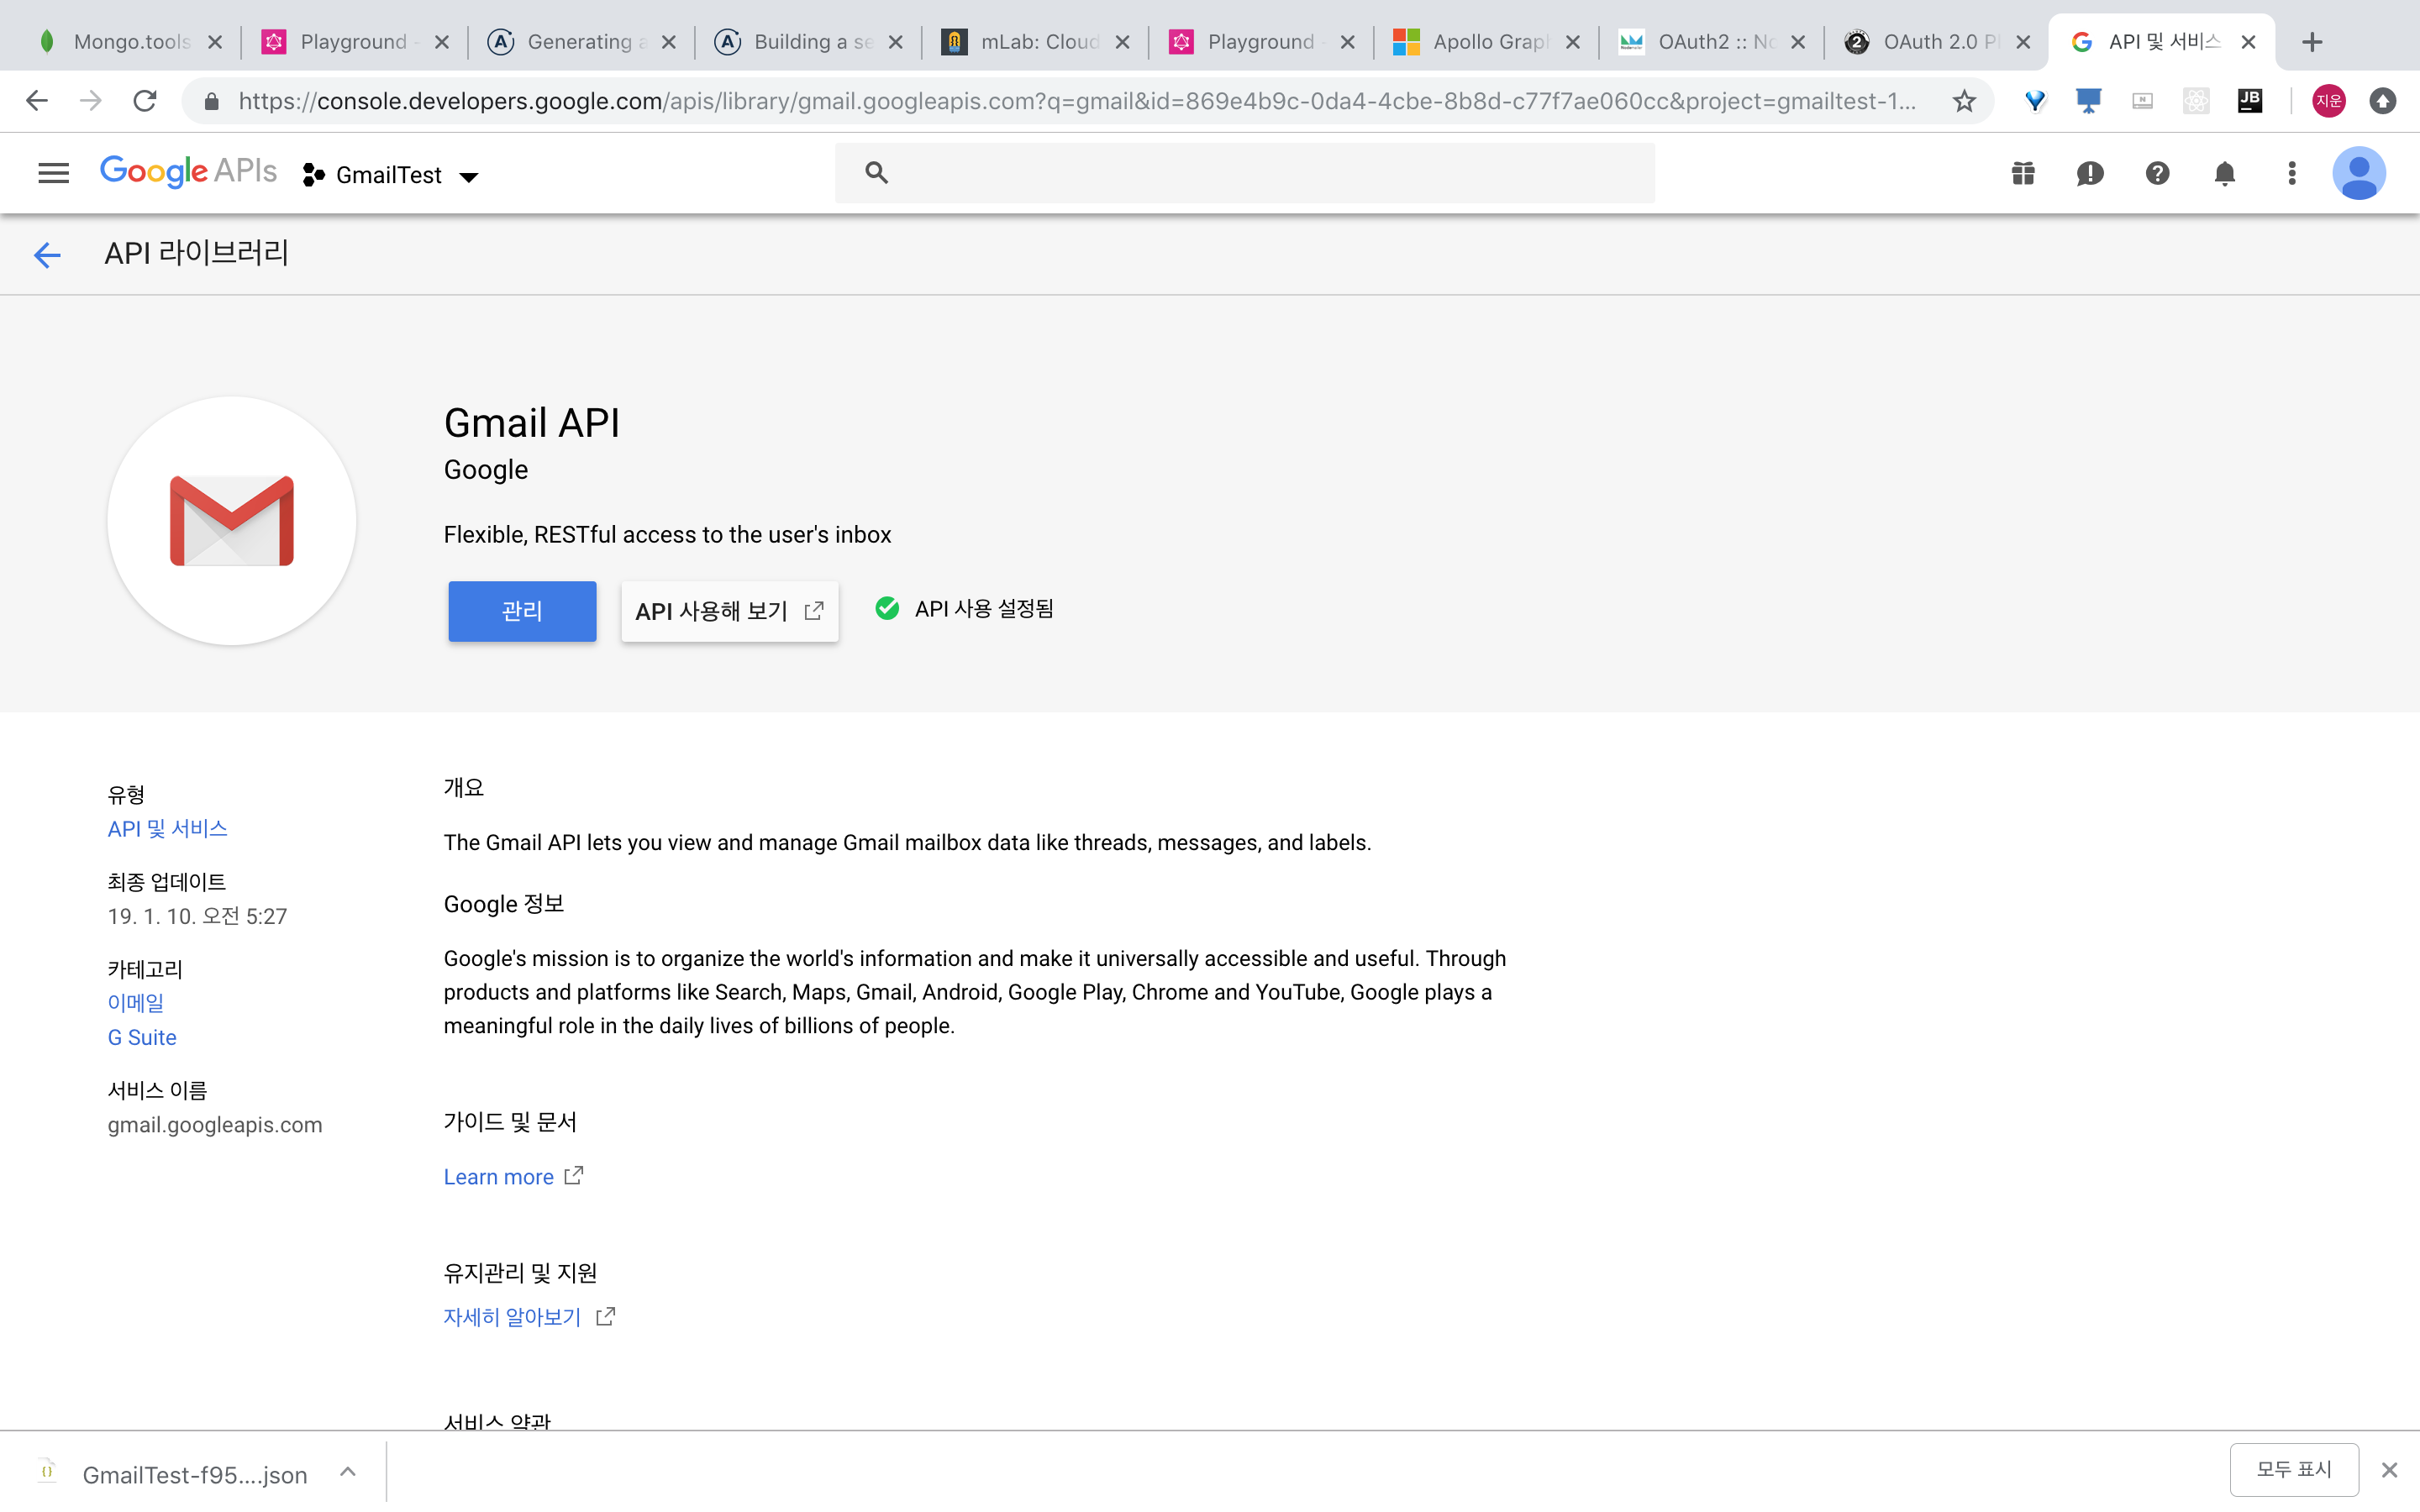
본인은 사용설정을 해서 관리라고 뜨는데 사용하기 혹은 뭐 사용설정이라고 뜰것이다.
혹 프로젝트를 생성하지 않았다면 생성해야할 수 있는데 생성해주도록 한다.
그리고 나서 화면 왼쪽의 탭에서 사용자 인증정보를 클릭한다.
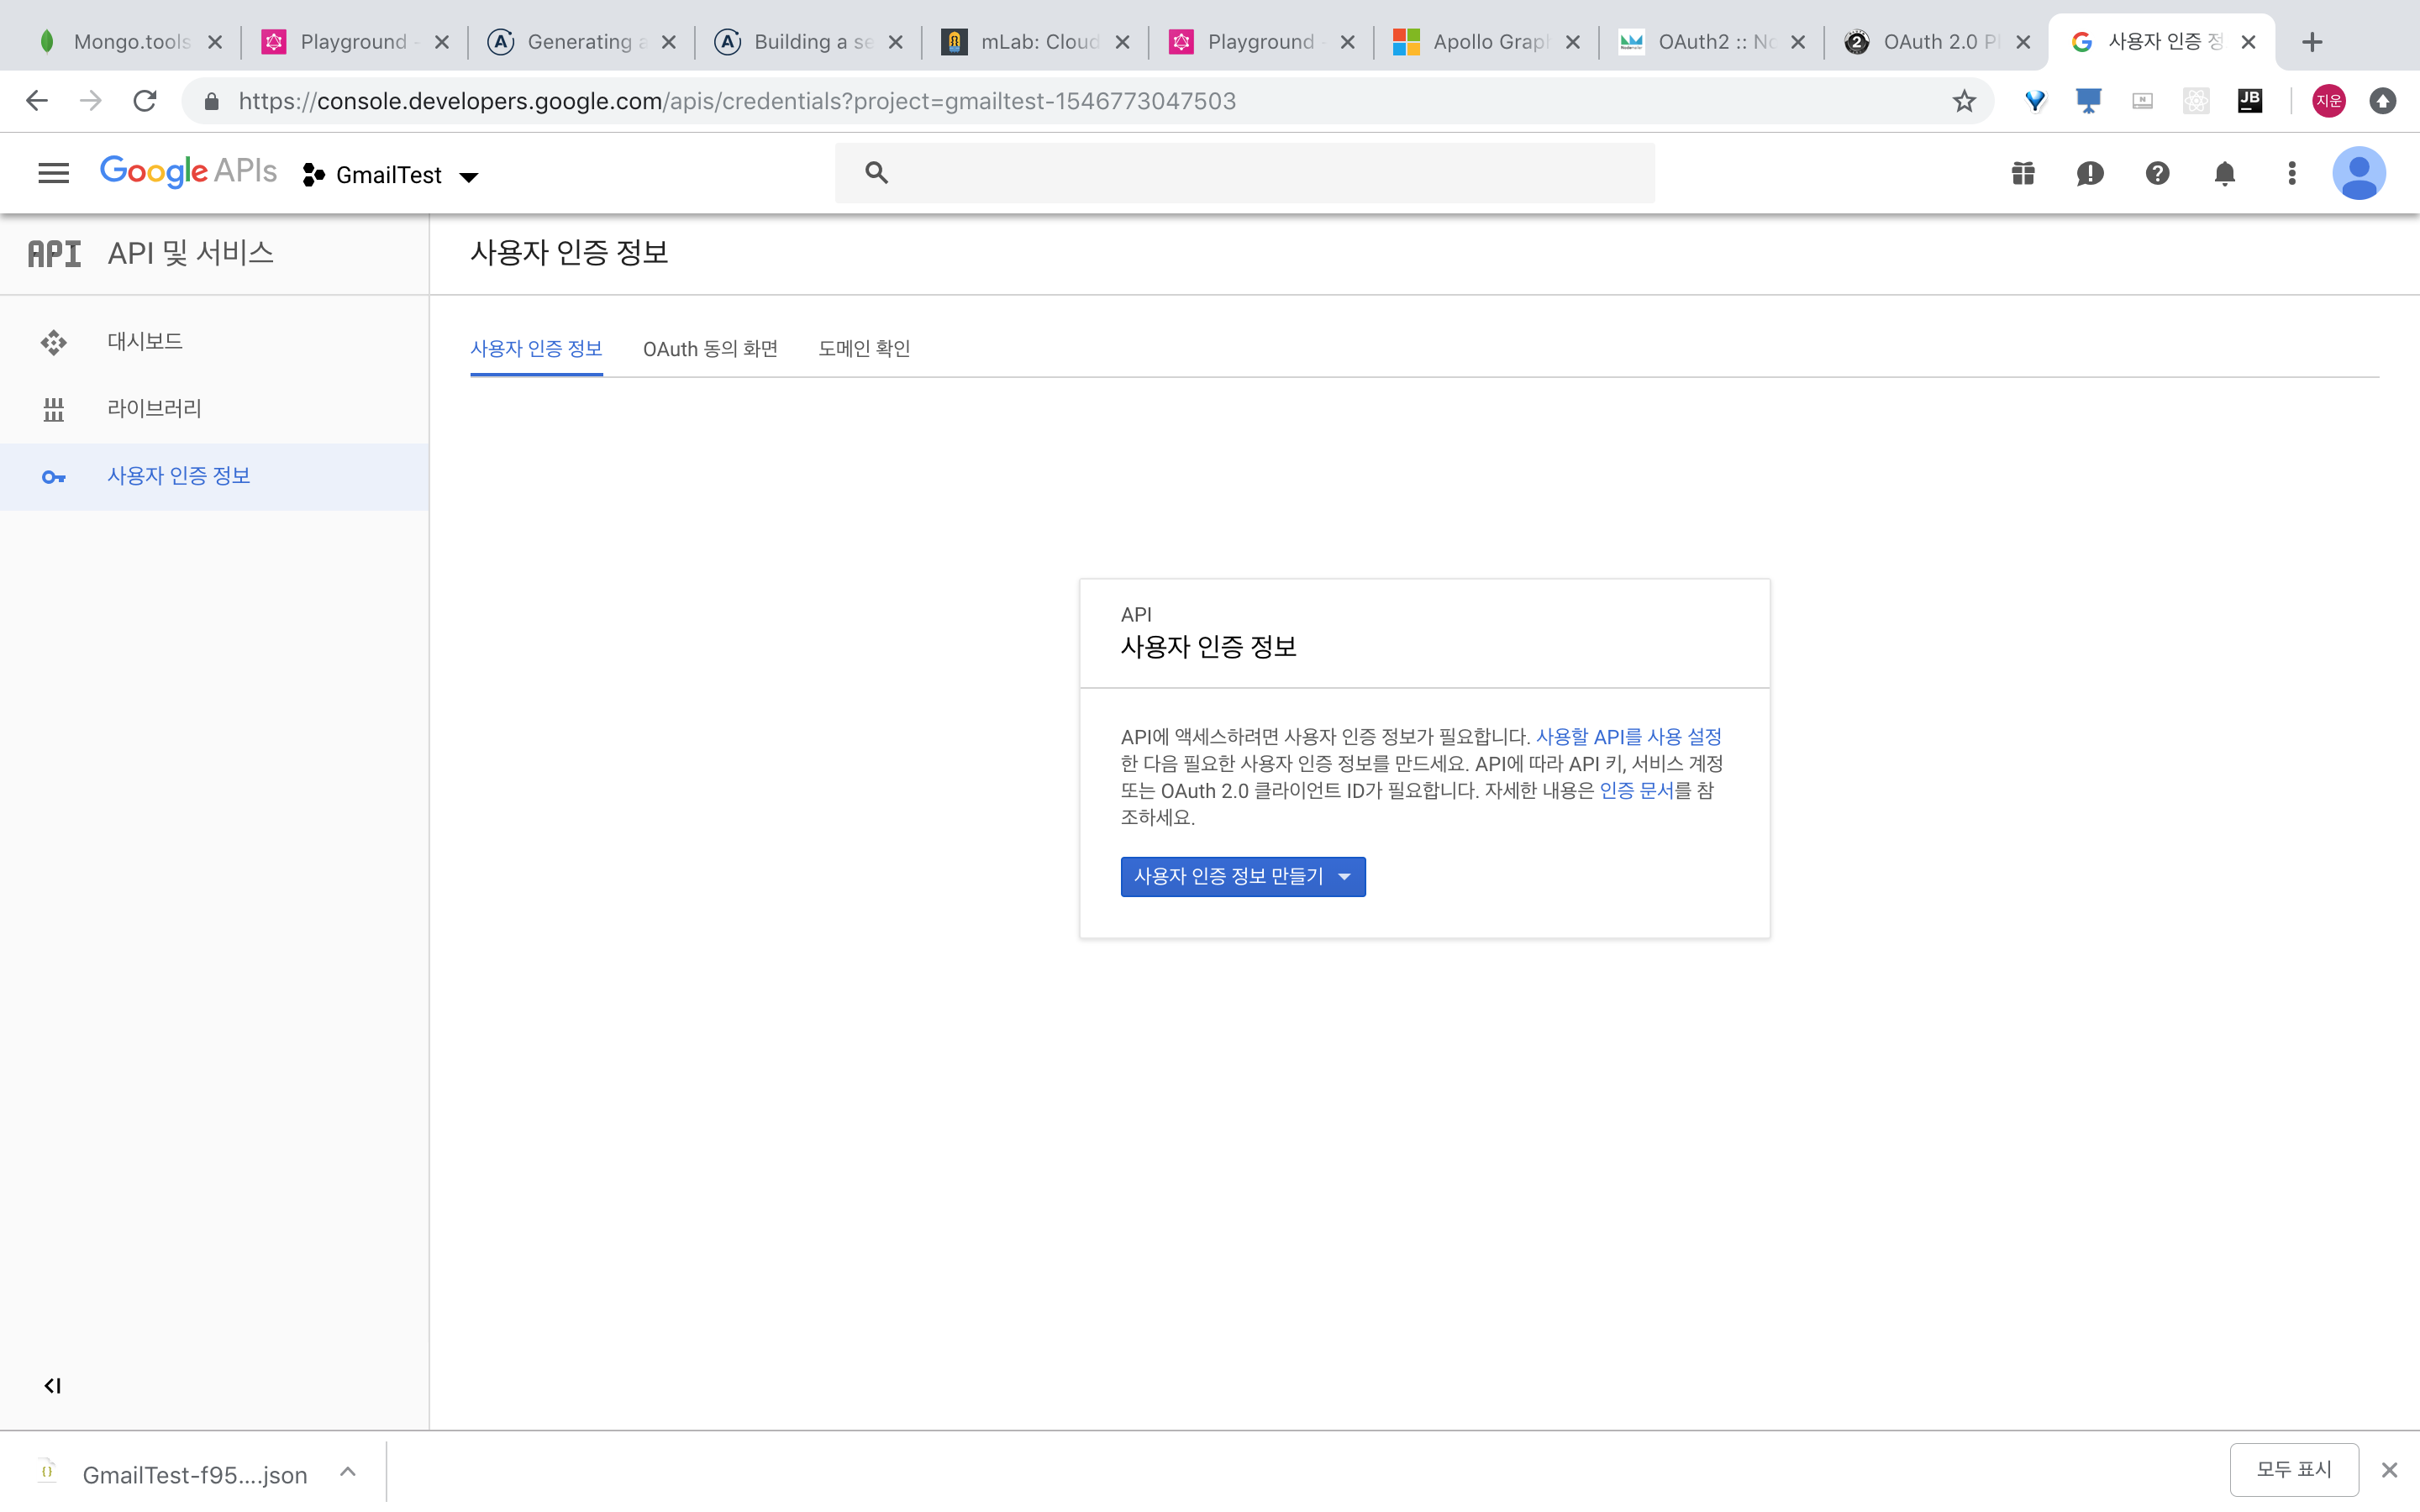
클릭하게되면 사용자 인증정보를 생성해야하는데 우리는 OAuth2 인증정보가 필요하므로 아래 화면과 같이 클릭한다.
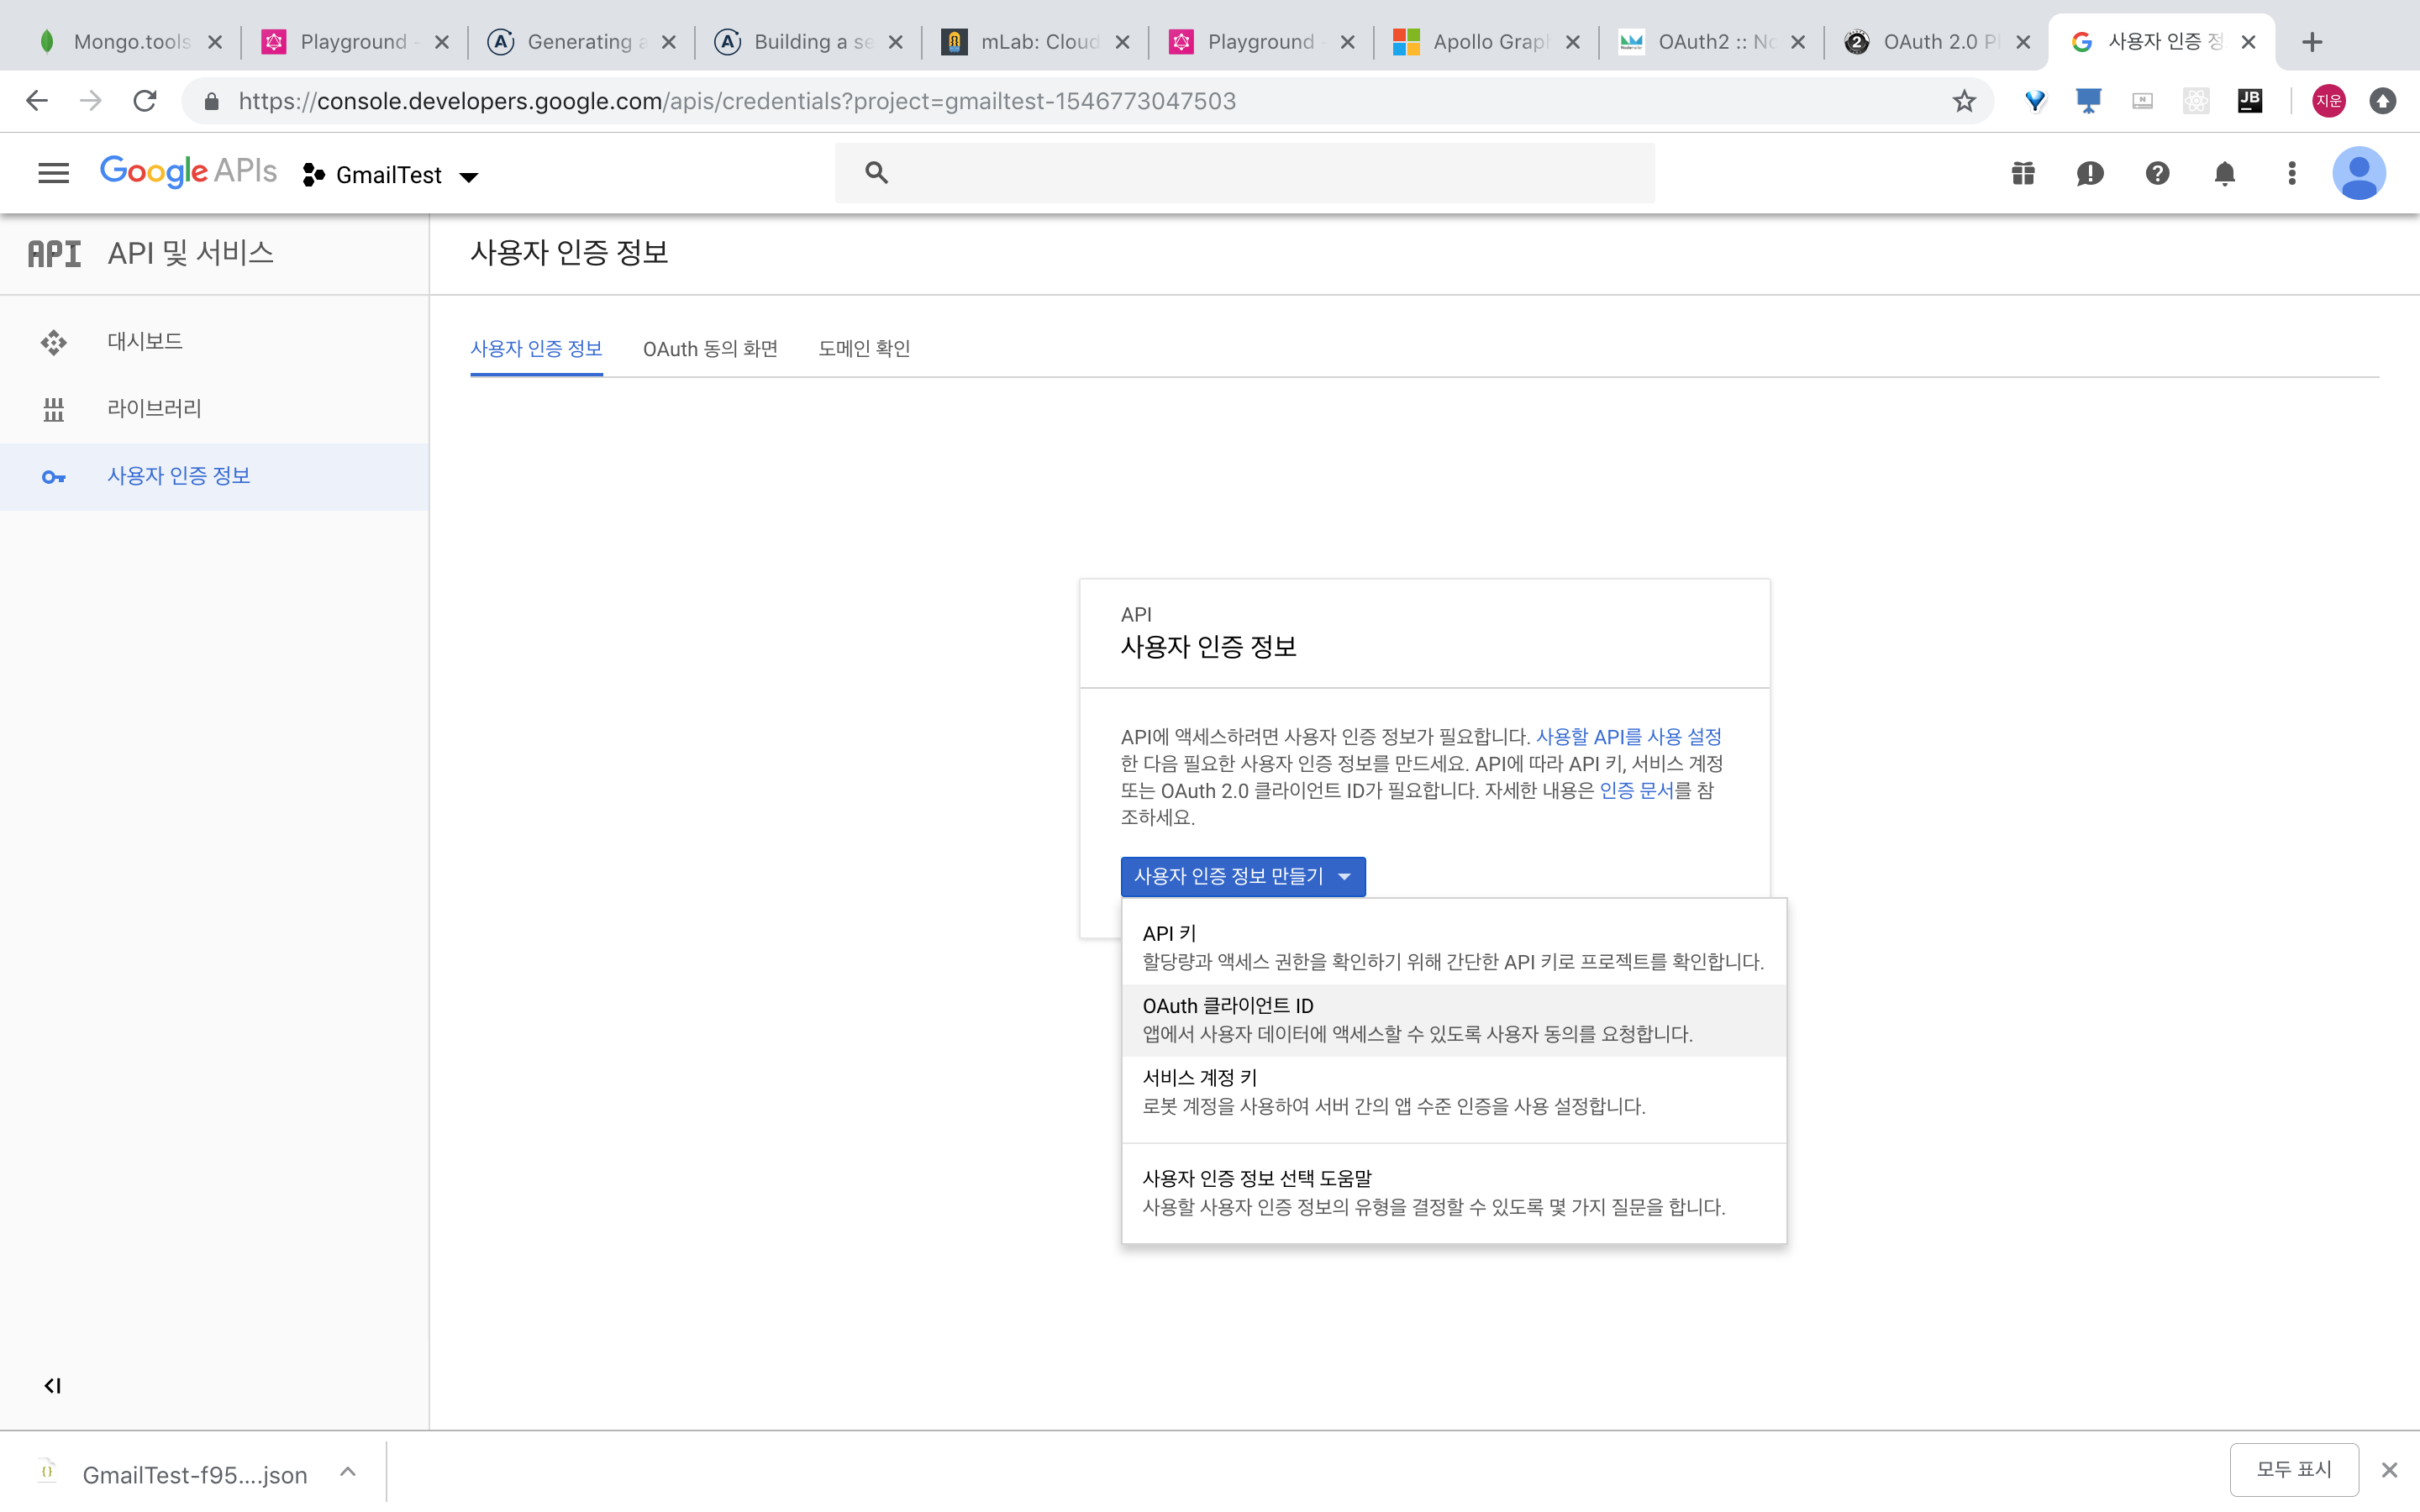
그러면 다음과 같이 화면이 나올건데
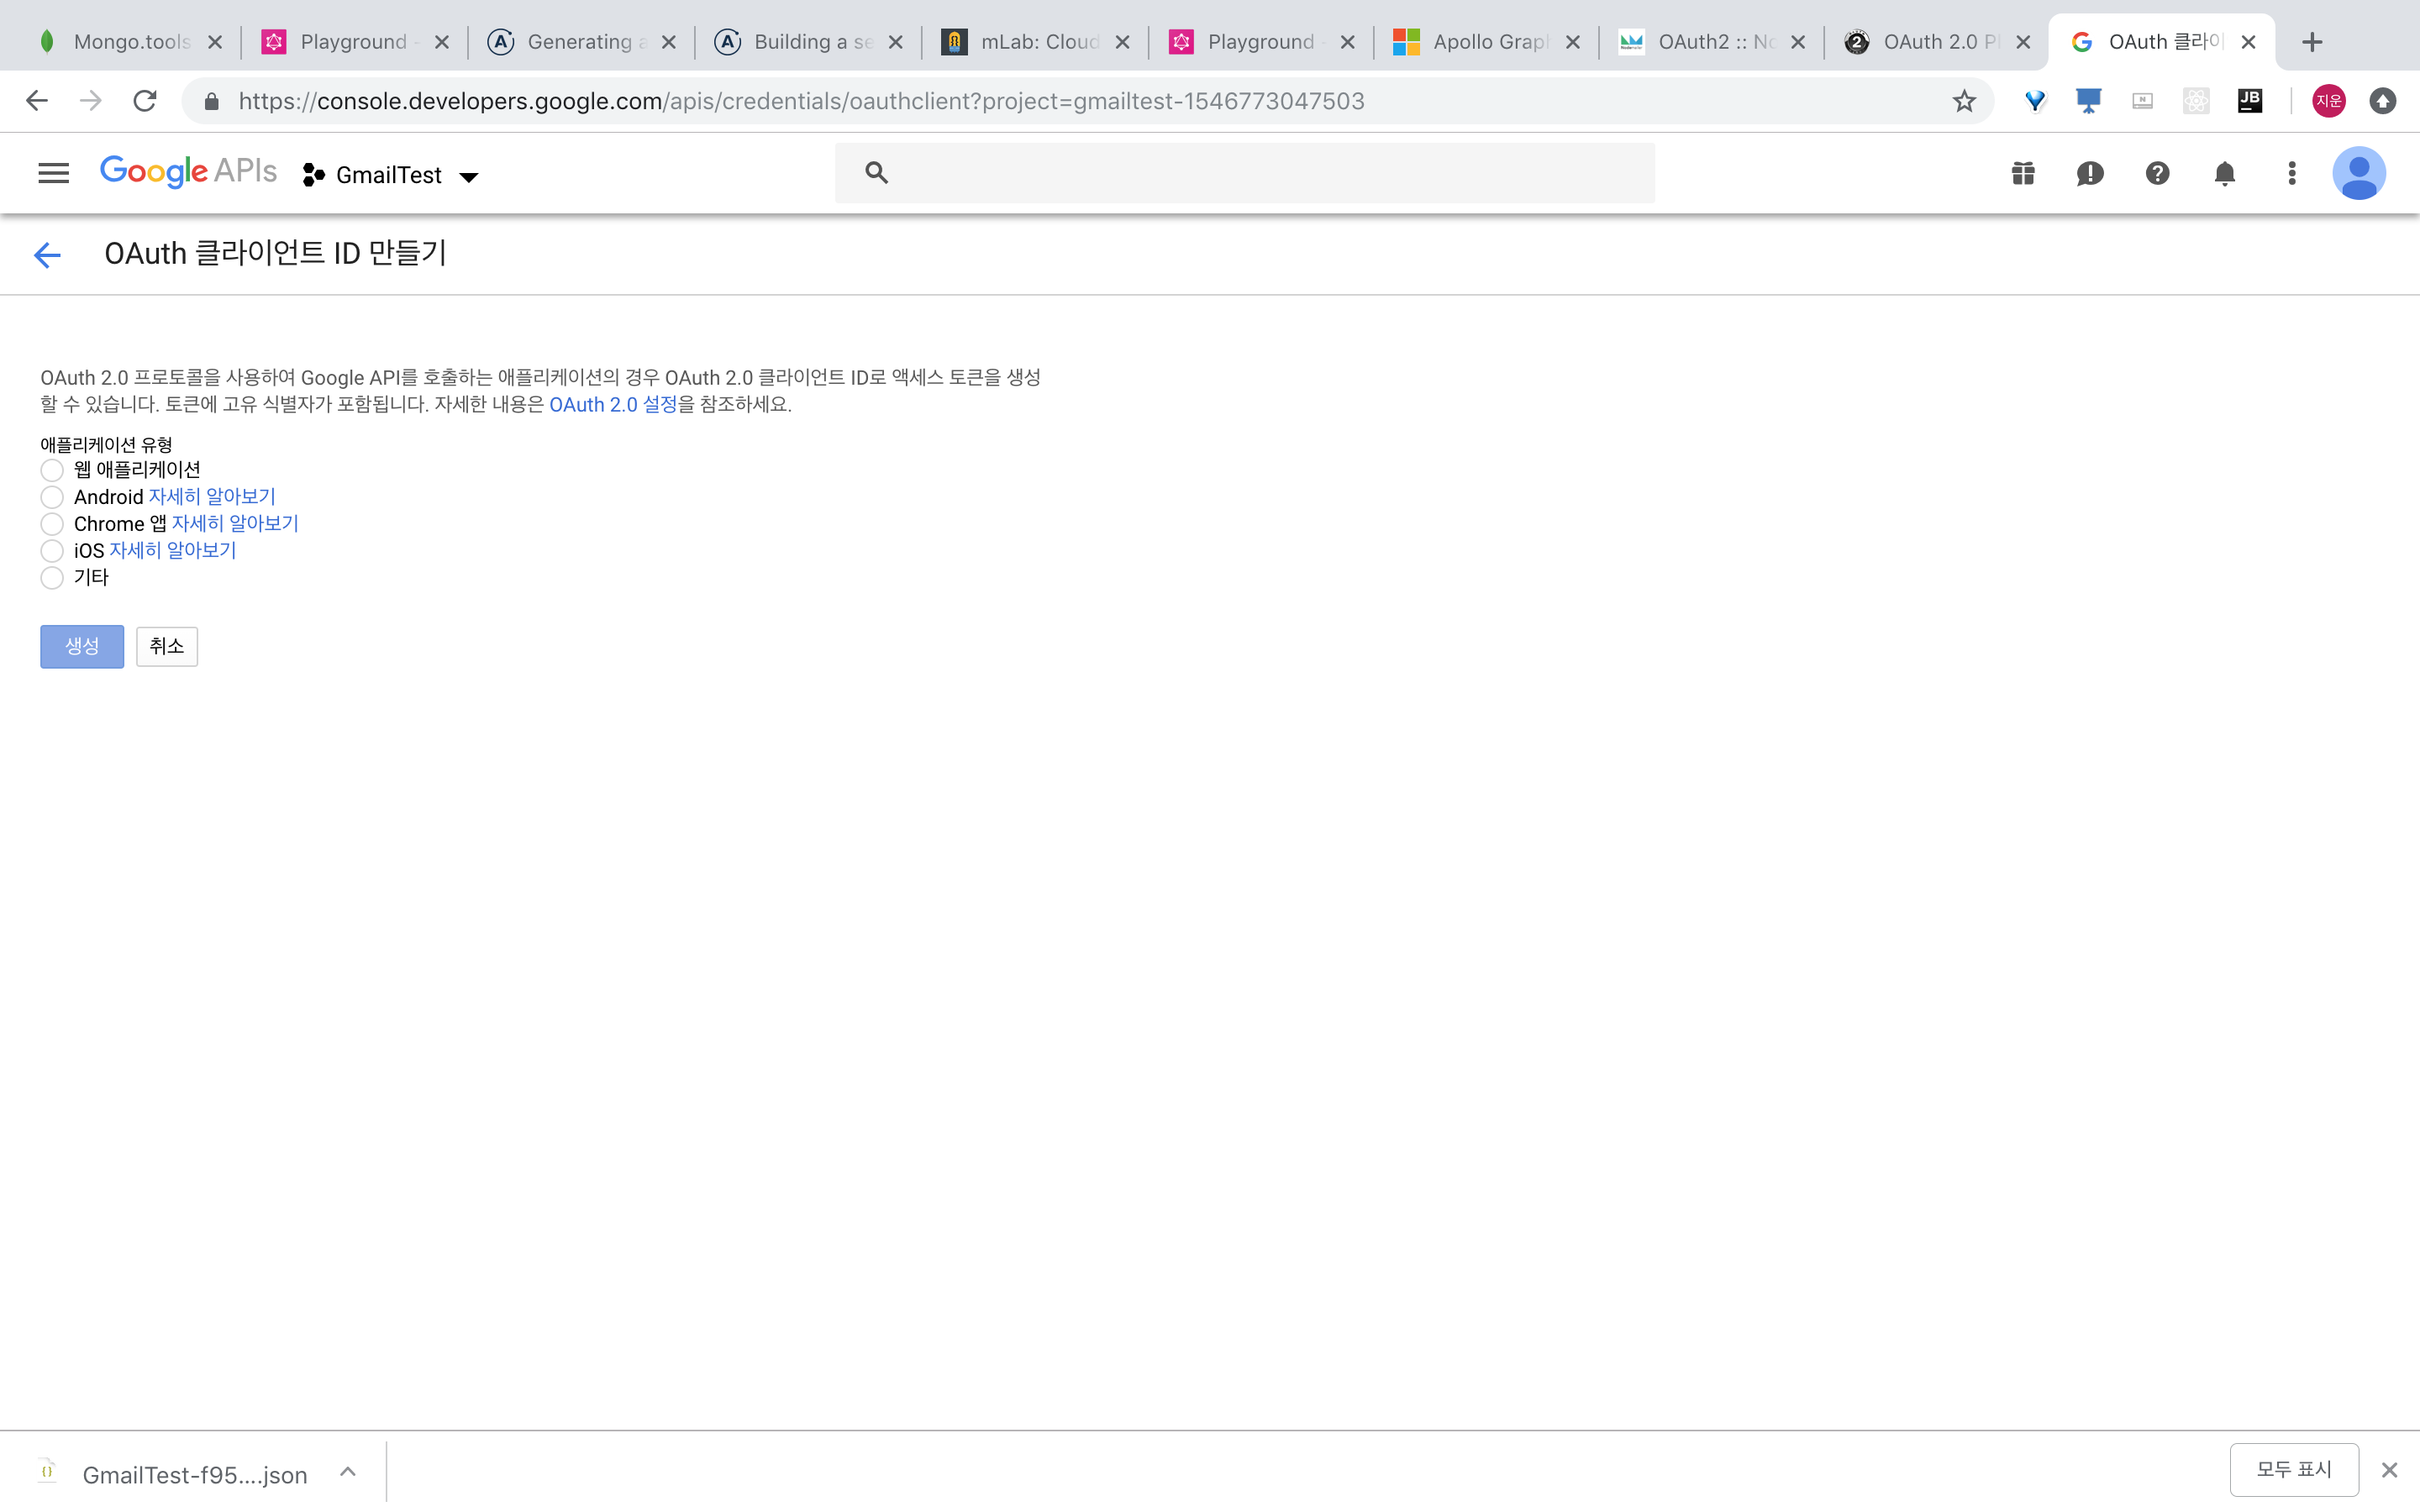
애플리케이션 유형은 웹어플리케이션으로 설정해준다.
이름에는 OAuth Client iddml 이름을 적어준다.
그리고 승인된 리디렉션 URI에는 https://developers.google.com/oauthplayground 를 적어준다.
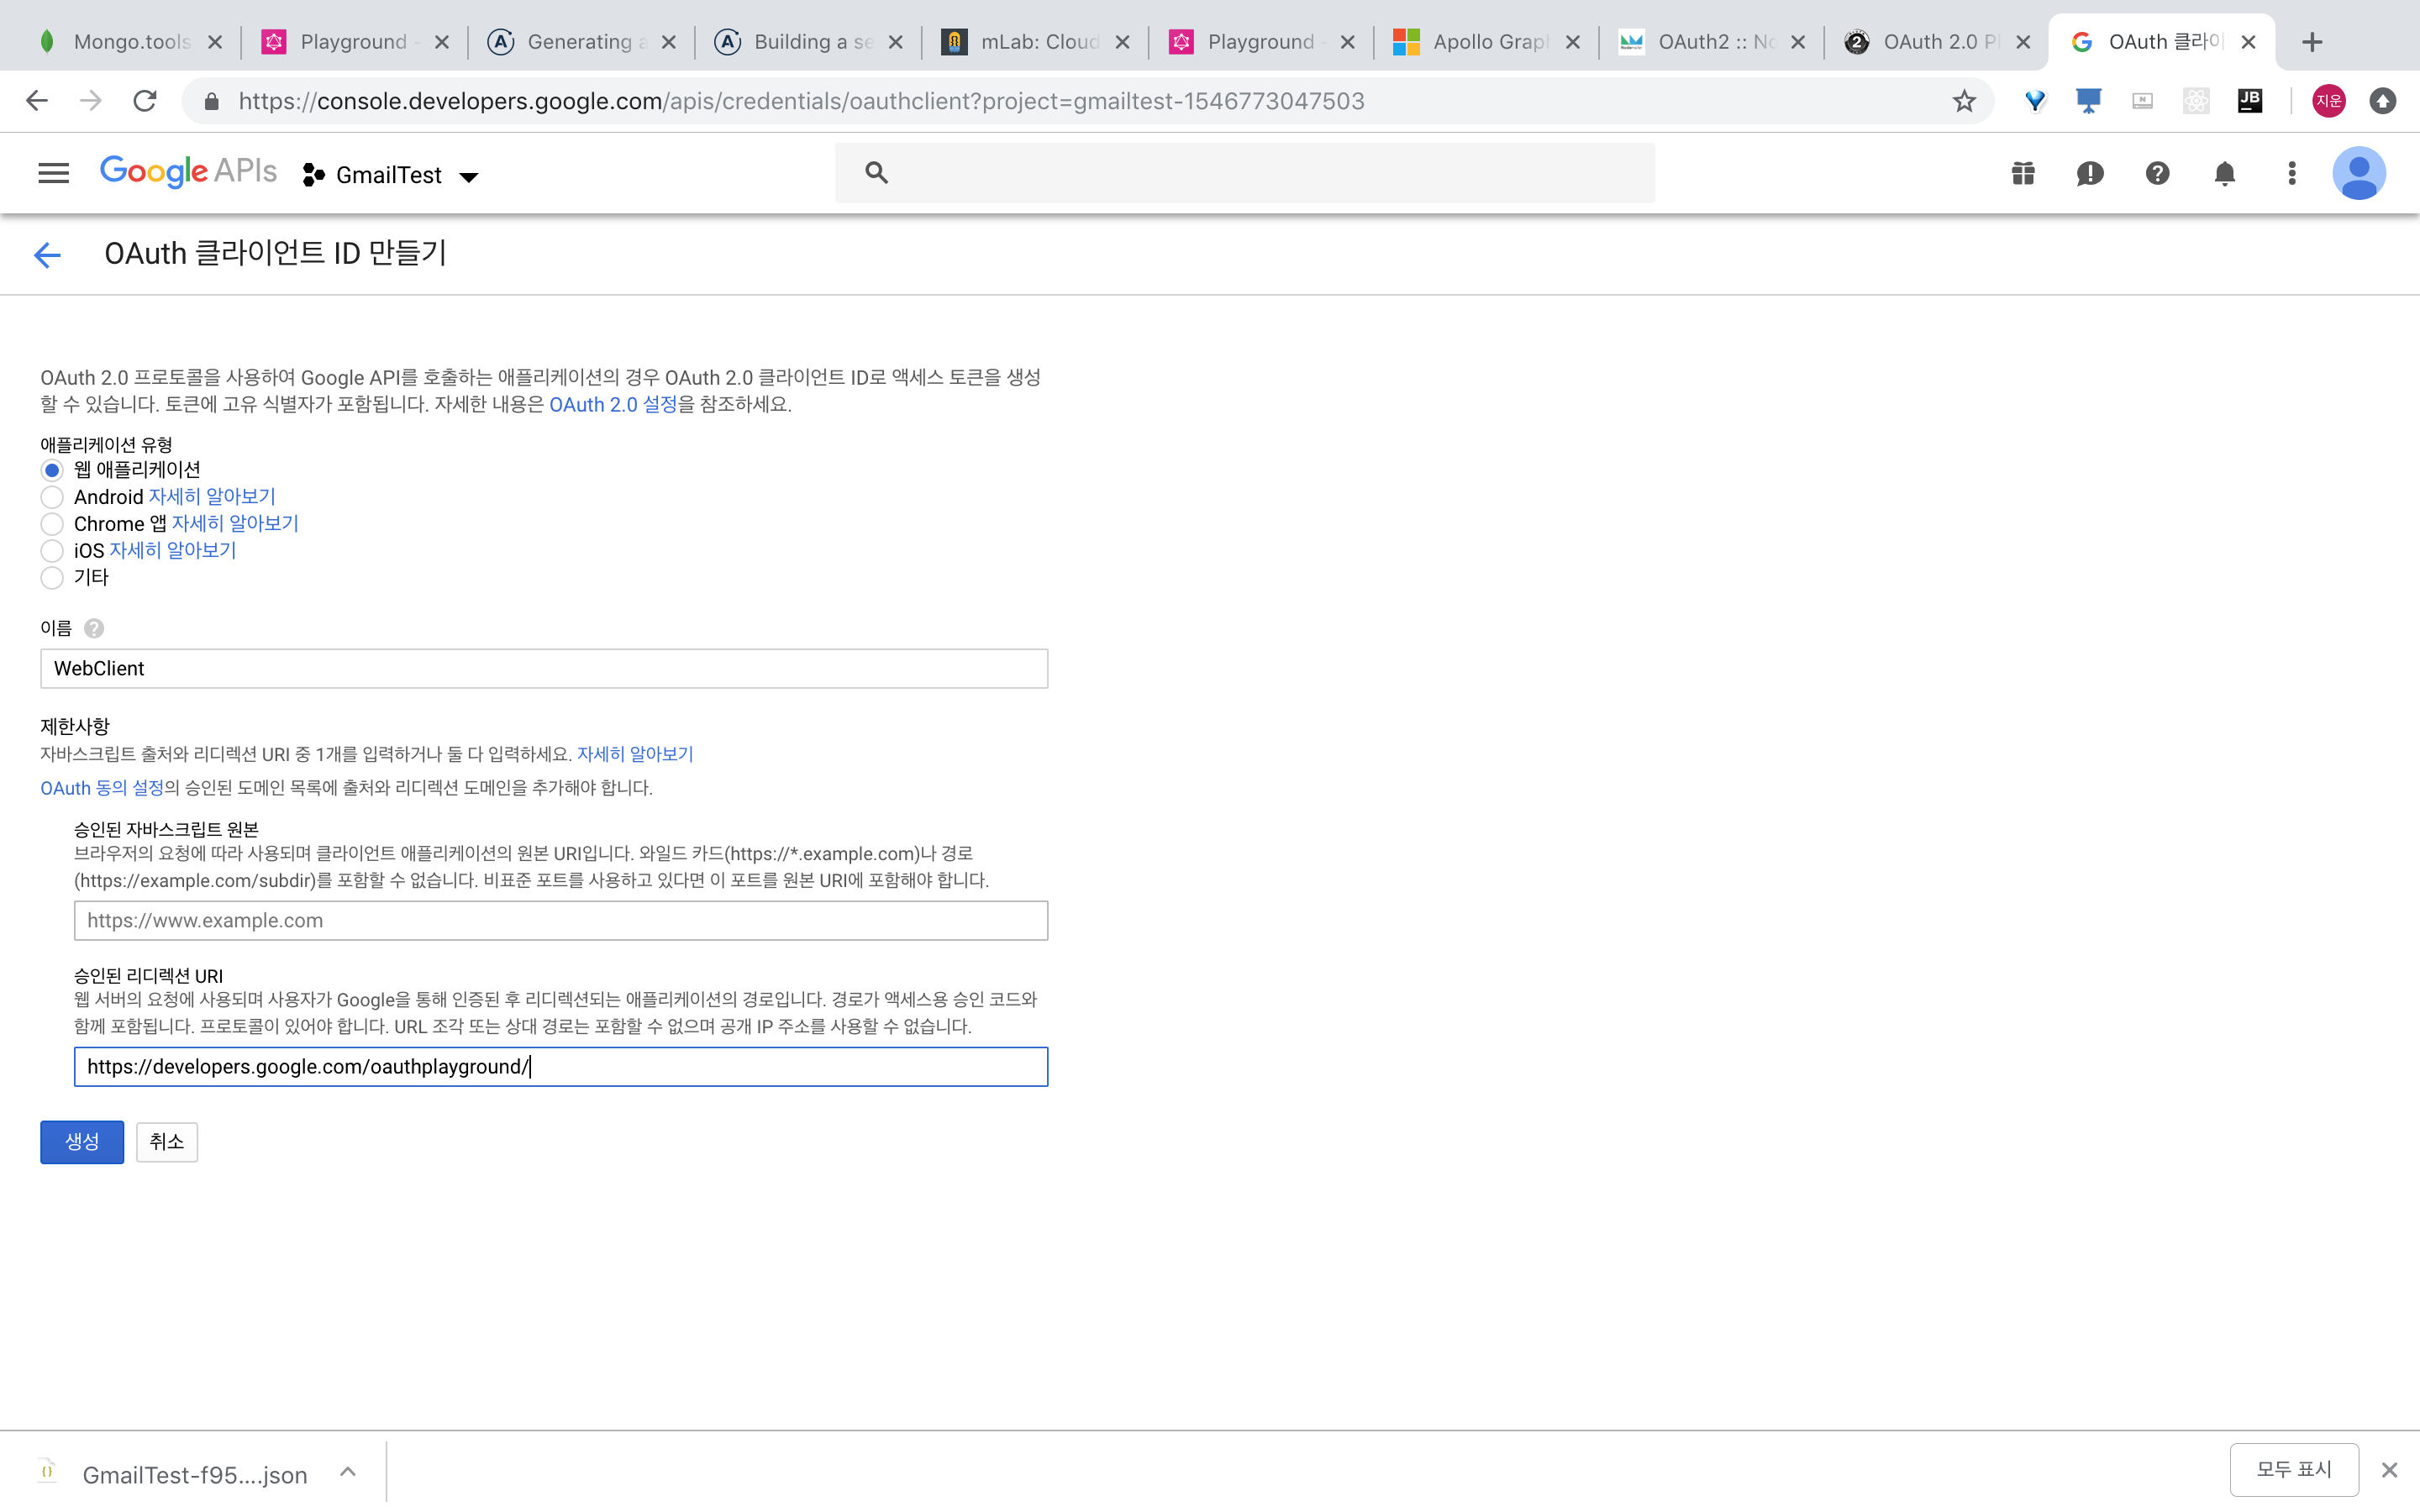
스크린 샷에 https://developers.google.com/oauthplayground/ 라고 되어있는데
https://developers.google.com/oauthplayground 를 정확하게 적어줘야한다.
그리고 나서 생성을 눌러준다.
그러면 클라이언트 ID, 와 클라이언트 보안 비밀인데 각각 GMAIL_CLIENT_ID, GMAIL_CLIENT_SECRET 에 들어갈 것이다.
이제 이창은 그대로 두고 https://developers.google.com/oauthplayground/ 화면으로 간다.
왼쪽의 Select & authorize APIs 를 클릭해서 Gmail api v1을 찾는다.
그리고 오른쪽의 톱니바퀴를 클릭하면 다이얼로그가 팬딩되는데 use your own OAuth credentials를 클릭한다.
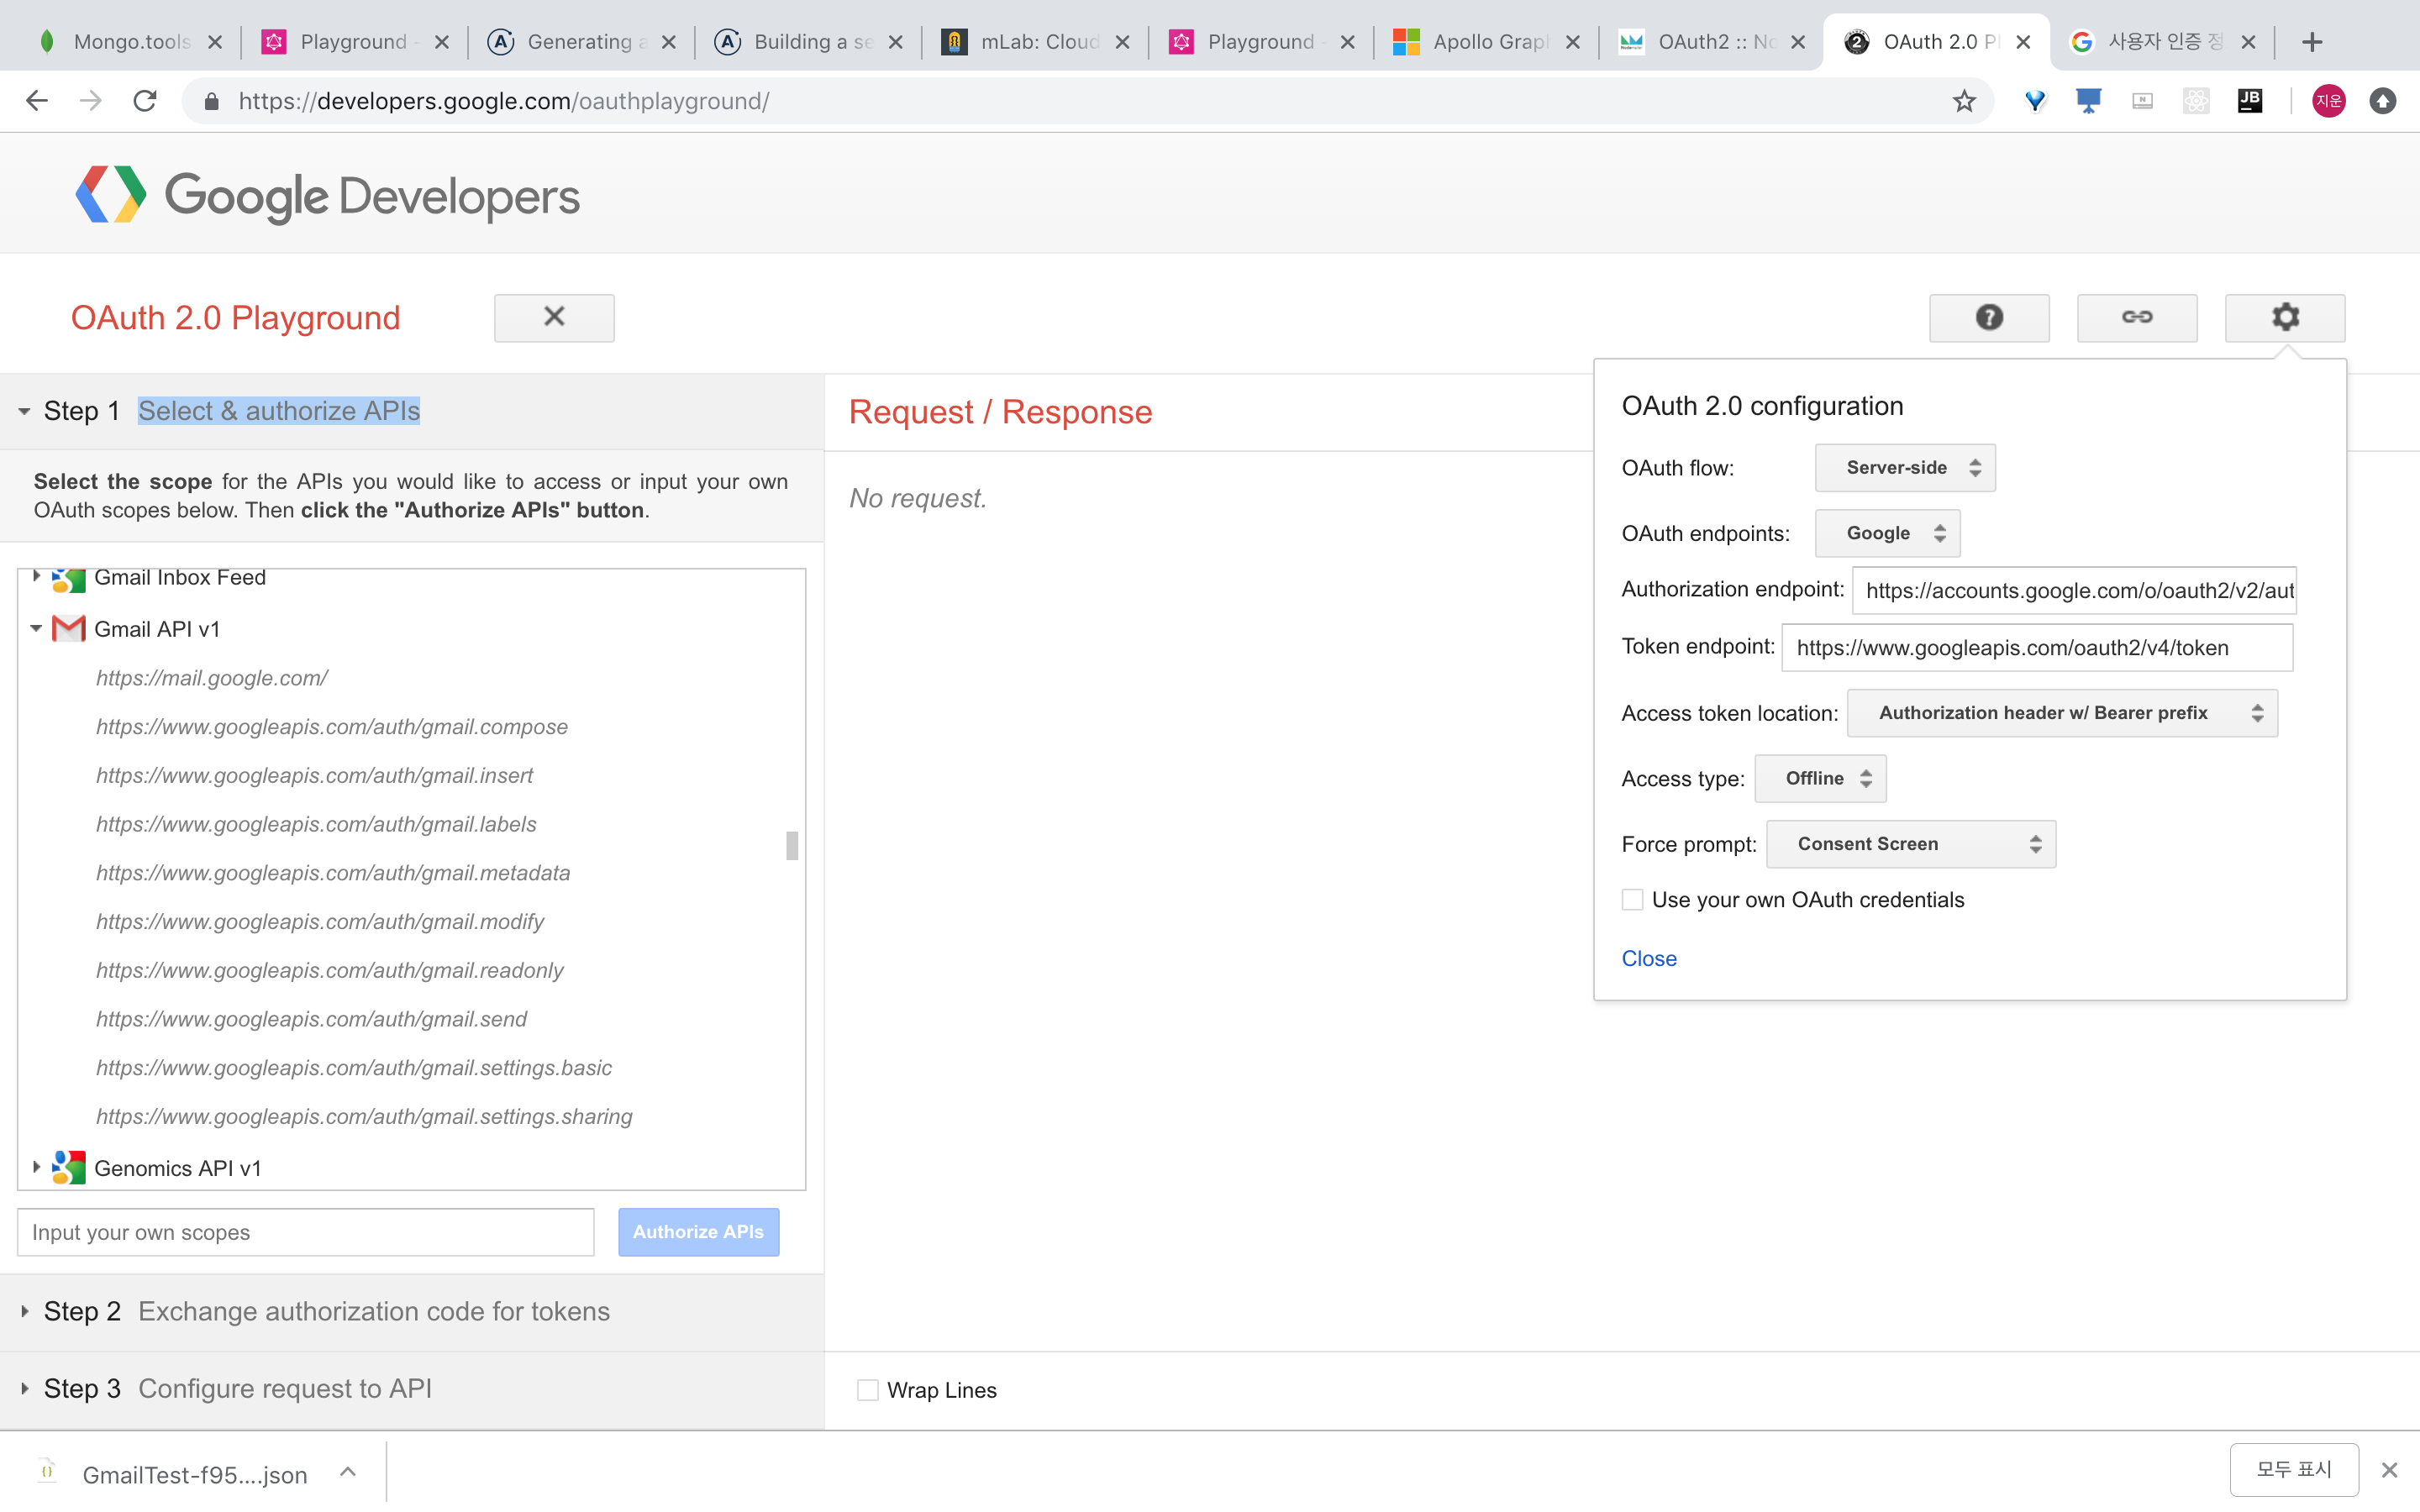 그러면 아래로 창이 확장되는데 OAuth Client ID, OAuth Client secret 에 구글 개발자 콘솔에서 떠있는 다이얼로그에서
OAuth Client ID 에 클라이언트 ID를 OAuth Client secret에는 클라이언트 보안 비밀을 복사해서 입력한다.
그리고 OAuthplayground 화면 왼쪽에서 Gmail API v1 https://mail.google.com/ 을 체크하고 Authorizes API버튼을 클릭한다.
그러면 토큰을 받을 수 있는 step2로 넘어간다. 여기서 보안에러 등이 뜰 수 있는데 허용해주고 넘어간다.
Auto-refresh the token before it expires 체크박스를 클릭해주고 Refresh token 과 Access token을 복사해서 .env 에 GMAIL_ACCESS_TOKEN 과 GMAIL_REFRESH_TOKEN 에 넣어준다.
물론 토큰을 얻는 방법은 google oauth api 를 래핑해놓은 다른 클라이언트를 이용해서도 할 수 있겠지만 이 방법도 괜찮아 보인다.
자 좀 길었는데 여기까지 왔으면 다 되었다.
이제 본격적으로 코드 작성을 해보자.
일단 Graphql 로 우리가 반환할 데이터를 정의한다.
프로젝트의 루트에 src 디렉토리를 생성하고 그 아래로 schemas라고 디렉토리를 하나 생성한다.
그리고 그 밑으로 user.ts를 생성한다.
/schemas/user.ts
import {Schema, Document} from 'mongoose'

export const UserSchema = new Schema({
    id: {type: String, required: true},
    password: {type: String, required: true},
    name: {type: String, required: true},
    email: {type: String, required: false},
    friend: [{type: Schema.Types.ObjectId, ref: 'User'}]
})

export interface IUser extends Document{
    _id: Schema.Types.ObjectId
    id: string
    password: string
    name: string
    email: string
    friend: [Schema.Types.ObjectId]
}
UserSchema와 그 UserSchema로 생성한 모델의 인터페이스를 정의한다.
코딩 컨벤션 및 린트에 따라 인터페이스 정의의 I는 안붙여도 상관없다.
자 이제 mongoose Schema는 작성했으니 Graphql 스키마를 작성한다.
일단 첫번째로 작성할 것은 scalar를 하나 정의해야한다.
MongoDB에서 사용하는 ObjectId가 우리가 사용하는 type-graphql 모듈에서 기본지원하는 scalar에 포함되어 있지 않기때문에 따로 정의해줘야 표현할 수 있다.
src디렉토리 및으로 scalars라고 디렉토리를 생성한다.
그리고 ObjectId.ts를 하나 생성하고 내용은 아래와 같이 작성한다.
ObjectId.ts
import { GraphQLScalarType, Kind } from 'graphql'
import { ObjectId } from 'mongodb'

export const ObjectIdScalar = new GraphQLScalarType({
  name: "ObjectId",
  description: "Mongo object id scalar type",
  parseValue(value: string) {
    return new ObjectId(value); // value from the client input variables
  },
  serialize(value: ObjectId) {
    return value.toHexString(); // value sent to the client
  },
  parseLiteral(ast) {
    if (ast.kind === Kind.STRING) {
      return new ObjectId(ast.value); // value from the client query
    }
    return null;
  },
});
String을 ObjectId로 ObjectId를 String으로 변환해준다.
type-graphql 에서 기본으로 제공하는 scalar에는 String, Int, Float등이 있다.
그러면 이제 user schema를 기준으로 Graphql type 정의를 한다.
src 디렉토리 아래에 objects라고 디렉토리를 하나 생성하고 그 아래로 user.ts를 생성한다.
그리고 내용은 아래와 같이 작성한다.
/objects/user.ts
import { ObjectType, Field } from "type-graphql";
import { IsEmail } from "class-validator";
import { ObjectIdScalar } from "../scalars/ObjectId";
import { ObjectId } from "mongodb";

@ObjectType({description:'Represent User Infomation'})
export default class User{
    @Field(() => ObjectIdScalar, {nullable: false, description: 'User Object Id'})
    readonly _id!: ObjectId
    @Field(() => String, {nullable: false, description: 'User Id'})
    id!: string
    @Field(() => String, {nullable: false, description: 'User Password'})
    password!: string
    @Field(() => String, {nullable: false, description: 'User Name'})
    name!: string
    @IsEmail()
    @Field(() => String, {nullable: true, description: 'User Eamil'})
    email?: string
}
@Field 데코레이터로 필드를 정의 할 수 있는데 이곳에는 문서화를 위한 옵션 및 문서에 나타낼 description등을 작성할 수 있다.
email 필드를 한번 보면 @Field위에 @IsEmail이 보일건데 class-validator 모듈에 기본 정의되어있는 validation 함수 이다.
당연히 커스텀 validation도 정의 할 수 있다.
자 이제 클라이언트에서 입력할 입력 값들의 타입을 정의한다.
src 디렉토리 아래로 argument_objects 라고 디렉토리를 생성한다.
그리고 InputUser.ts를 생성하고 내용은 아래와 같이 작성한다.
import { InputType, Field } from "type-graphql";

@InputType({description: 'Required properties to create User Object'})
export default class InputUser{
    @Field(() => String, {nullable: false, description: 'User id'})
    id!:string
    @Field(() => String, {nullable: false, description: 'User password'})
    password!:string
    @Field(() => String, {nullable: false, description: 'User email'})
    email!:string
    @Field(() => String, {nullable: false, description: 'User name'})
    name!:string
}
User 생성시 사용할 것으로 모든 필드들을 입력하도록 각 필드들의 nullable을 false로 주었다.
필드 선언에 ! 가 붙은것은 해당 필드가 null 이나 undefined 가 아닐거라는 걸 알고 있다고 컴파일러에게 말해주는 것으로
해당 변수 사용시 컴파일러에게 undefined 일수 있다느니 하는 태클을 걸지 말라고 이야기 하는것이다.
?는 null 혹은 undefined 일 수 있다는 것이다.
어쨋든 id, password, email, name 을 입력 받을 것이다.
자 그 다음에는 argument_objects 디렉토리에 ModifyUser.ts 라고 생성한다.
그리고 내용은 아래와 같이 작성한다.
ModifyUser.ts
import { InputType, Field, ArgsType } from "type-graphql";
import { ObjectIdScalar } from "../scalars/ObjectId";
import { ObjectId } from "mongodb";
import { IsEmail } from "class-validator";
@ArgsType()
export class ArgsUser {
    @Field(() => ObjectIdScalar, { nullable: false, description: 'User _id(ObjectId)' })
    _id: ObjectId
}
@InputType({ description: 'Required properties to create User Object' })
export default class ModifyUser {
    @Field(() => String, { nullable: true, description: 'User password' })
    password!: string
    @Field(() => String, { nullable: true, description: 'User email' })
    email!: string
    @Field(() => String, { nullable: true, description: 'User name' })
    name!: string
}
@ArgsType은 입력 받는 argument가 여러개일 때 묶어서 사용하는 용도로 사용하고
@InputType은 입력 받는 argument를 정의한 Object 형태로 입력 받는것이다.
자세한 차이점은 사용방법을 보면 이해가 쉬우니 Resolver까지 작성하고 보도록하자.
자 이제 응답처리를 할 Resolver를 작성해본다.
src 디렉토리 아래로 resolvers 라고 디렉토리를 생성한다.
그리고 UserResolver.ts 파일을 생성한다.
내용은 아래 처럼 입력한다.
UserResolver.ts
import { Resolver, Query, Arg, Mutation, InputType, Args } from 'type-graphql'
import User from '../objects/user'
import { models, Model } from 'mongoose'
import { IUser } from '../schemas/user'
import InputUser from '../argument_objects/InputUser';
import ModifyUser, { ArgsUser } from '../argument_objects/ModifyUser';
import nodemailer from 'nodemailer'
import dotenv from 'dotenv'
dotenv.config()
@Resolver()
export default class UserResolver {
    readonly users: Model<IUser> = models.User
    @Query(returns => User, { nullable: true, description: 'Find One User' })
    async user(@Arg('id') id: String): Promise<User | null> {
        return await this.users.findOne({ id }).lean()
    }
    @Mutation(returns => User, { nullable: false, description: 'Create User' })
    async signUp(@Arg('user') user: InputUser): Promise<User> {
        const savedUser = await this.users.create({ ...user })
        return savedUser.toObject()
    }
    @Mutation(returns => User, { nullable: false, description: 'Modify User' })
    async modifyUser(@Args() { _id }: ArgsUser, @Arg('modify') modify: ModifyUser): Promise<User> {
        return await this.users.findOneAndUpdate({ _id }, { $set: { ...modify } }, { new: true }).lean()
    }
    @Query(returns => Boolean, { nullable: false, description: 'Email Send' })
    async sendEmail(@Args() { _id }: ArgsUser): Promise<Boolean> {
        const user = await this.users.findOne({_id}).lean()
        const transport = nodemailer.createTransport({
            service: 'Gmail',
            secure: true,
            auth: {
                type: 'OAuth2',
                user: process.env.GMAIL_ID,
                clientId: process.env.GMAIL_CLIENT_ID,
                clientSecret: process.env.GMAIL_CLIENT_SECRET,
                refreshToken: process.env.GMAIL_REFRESH_TOKEN,
                accessToken: process.env.GMAIL_ACCESS_TOKEN,
                expires: 3600
            }
        })
        const sendResult = await transport.sendMail({
            from: {
                name: '인증관리자',
                address: process.env.GMAIL_ID
            },
            subject: '내 서비스 인증 메일',
            to: [user.email],
            text: 'Hello World'
        })
        return sendResult.accepted.length>0
    }
}
Resolver는 @Resolver 데코레이터를 붙여주고 선언한다.
UserResolver class는 mongoose 의 스키마를 이용해 생성된 모델 readonly users: Model<IUser> = models.User을 가진다.
그리고 @Query, @mutation 작업을 수행할 함수들을 가진다.
일단 유저 조회용 Query를 본다.
    @Query(returns => User, { nullable: true, description: 'Find One User' })
    async user(@Arg('id') id: String): Promise<User | null> {
        return await this.users.findOne({ id }).lean()
    }
resturns => User는 Graphql client가 선택할 수 있는 필드가 User 를 따른다는 것으로
id, email, name, password를 선택적으로 받을 수 있다는 것이다.
user 함수를 async로 처리한것은 await으로 비동기 함수를 제어하기 위해서 이다.
입력 값은 @Arg로 단일 argument String 타입의 id 를 정의했다.
예를들어서 여러개의 Arg가 필요하면 함수에 전부 적기도 귀찮고 보기도 안좋을 것이다.
이때 @ArgsType을 이용한다.
| user 함수의 리턴 타입은 async 함수 이기에 Promise 반환이며 Promise 의 결정 값인데 이 값의 타입은 User | null일 수 있다. |
사실 이 부분은 에러 핸들링과 각종 예외 처리가 들어가면 깔끔하게 null을 없앨 수 있다. 아래 코드를 보자
    @Query(returns => User, { nullable: true, description: 'Find One User' })
    async user(@Arg('id') id: String): Promise<User> {
        let user: User | null
        try{
            user = await this.users.findOne({ id }).lean()
        }catch(e){
            // throw MongoDB Error
        }
        if(!user){
            // throw User Not Found error
        }
        return user
    }
주석으로 throw하라고 해놓은 곳에서 throw해주면 된다.
하지만 이번 포스팅에서는 에러핸들링은 안할거기때문에 null이 나올 수 있도록 한다.
그 다음은 signUp함수를 본다.
    @Mutation(returns => User, { nullable: false, description: 'Create User' })
    async signUp(@Arg('user') user: InputUser): Promise<User> {
        const savedUser = await this.users.create({ ...user })
        return savedUser.toObject()
    }
signUp 함수는 단일 @Arg user를 정의 했는데 앞에서 정의한 @InputType 의 InpuUser 타입으로 지정했다.
@ArgsType 과 @InputType의 차이를 여기서 이야기 해본다.
클라이언트에서 파라미터를 입력할때 포맷이 다르다.
일단 @InputType은 입력시 user:{key:value,…}와 같이 오브젝트로 입력하라는 것이고
@ArgsType은 key:value,key:value와 같이 key, value 로 입력하라는 것이다.
playground에서 직접 입력 해보면 더 눈에 보일 것이다.
어쨋든 입력 받은 값을 mognoose 의 create 함수의 인자로 넘겨 User Document를 생성한결과를 savedUser 에 담고
리턴하는데 toObject 함수는 document를 plain javascript object로 만들어 주는 것이다.
document는 save, update, … 과 같은 함수들과 여러가지 프로퍼티가 추가되어 있는 객체이다.
이를 우리가 생성한 스키마의 키밸류만 가진 자바스크립트 오브젝트로 변환해주는 함수이다.
lean()또한 마찬가지의 함수이다. 따로 있는 이유는 create, findOne 등의 함수의 반환 타입이 다르기때문이다.
그 다음 modifyUser함수를 본다.
    @Mutation(returns => User, { nullable: false, description: 'Modify User' })
    async modifyUser(@Args() { _id }: ArgsUser, @Arg('modify') modify: ModifyUser): Promise<User> {
        return await this.users.findOneAndUpdate({ _id }, { $set: { ...modify } }, { new: true }).lean()
    }
_id 와 modify:{key:value,…}으로 입력을 받고 받은 입력값으로 User Object를 업데이트 한 결과를 반환한다.
@Args() { _id }: ArgsUser 이 구문은 ArgsUser Object의 _id 키를 가진걸 _id로 선언한것으로 이러한 문법을 destructuring 이라고 한다.
그리고 추가로 @InputType인 ModifyUser 타입의 modify를 입력으로 받고
이 값들을 findOneAndUpdate 로 던져줬다. ...modify와 같은 구문을 spread라고 한다. array 혹은 object를 펼치는 역할을 한다.
자 이제 메일을 보내는 함수인 sendMail을 보자.
@Query(returns => Boolean, { nullable: false, description: 'Email Send' })
    async sendEmail(@Args() { _id }: ArgsUser): Promise<Boolean> {
        const user = await this.users.findOne({_id}).lean()
        const transport = nodemailer.createTransport({
            service: 'Gmail',
            secure: true,
            auth: {
                type: 'OAuth2',
                user: process.env.GMAIL_ID,
                clientId: process.env.GMAIL_CLIENT_ID,
                clientSecret: process.env.GMAIL_CLIENT_SECRET,
                refreshToken: process.env.GMAIL_REFRESH_TOKEN,
                accessToken: process.env.GMAIL_ACCESS_TOKEN,
                expires: 3600
            }
        })
        const sendResult = await transport.sendMail({
            from: {
                name: '인증관리자',
                address: process.env.GMAIL_ID
            },
            subject: '내 서비스 인증 메일',
            to: [user.email],
            text: 'Hello World'
        })
        return sendResult.accepted.length>0
    }
nodemailer의 createTransport 함수로 smtp transport르 생성하는데 이때 우리가 앞에서 받아서 넣어놨던
GMAIL_ID,GMAIL_CLIENT_ID,GMAIL_CLIENT_SECRET,GMAIL_REFRESH_TOKEN,GMAIL_ACCESS_TOKEN 을 사용한다.
secure옵션은 보안 포트를 이용할지 여부이며 나머지 옵션은 이름만 봐도 알것이다.
그 다음 생성한 transport의 sendMail()를 호출한다.
from은 보내는이 to는 받는이의 메일 주소가 들어가며 to에는 string | Address | Array<string | Address> 이 들어갈 수 있다.
여기서 Address type은 위 from 의 {name: string, address: string}이다.
subject는 메일의 제목 string이고
text는 메일의 텍스트 내용이다.
html도 보낼 수 있는데 해당 내용은 다음 포스팅에서 JWT 생성 작업등을 진행하며 할 것이다.
sendMail의 결과로는 수락된 결과, 메일서버 응답, 거절결과 등등이 담겨 있는데
여러 수신자에게 보낼 시 하나라도 수락되면 보내진걸로 본다.
위 에서는 어차피 검색된 유저 한명에게 보냈기에 그냥 sendResult.accepted.length>0로 정상적으로 보내졌다고 응답을 보내지만
혹시 중요한 메일이며 다량을 발송할시에는 rejected도 확인하여서 재전송처리를 해야한다.
자 리졸버는 다 작성 하였다.
이제 서버에 여태 작성한 것들을 전달해서 실행해본다.
src에 index.ts 파일을 생성하고 아래와 같이 작성한다.
/src/index.ts
import 'reflect-metadata'
import express from 'express'
import { ApolloServer, gql } from 'apollo-server-express'
import UserResolver from './resolvers/UserResolver'
import { buildSchema } from 'type-graphql'
import mongoose from 'mongoose'
import { UserSchema } from './schemas/user'
import { ObjectIdScalar } from './scalars/ObjectId'
import { ObjectId } from 'mongodb'
import dotenv from 'dotenv'
dotenv.config()
async function boot() {
  const app = express()
  const port = 3000
  mongoose.model('User', UserSchema)
  const db = await mongoose.connect(process.env.MONGOURL,
    {
      autoReconnect: true,
      useNewUrlParser: true,
    })
  const resolvers = await buildSchema({
    resolvers: [UserResolver],
    scalarsMap: [{ type: ObjectId, scalar: ObjectIdScalar }],
  })
  const apolloServer = new ApolloServer({
    schema: resolvers,
    playground: true,
    tracing: true,
  })
  apolloServer.applyMiddleware({ app })
  try {
    await app.listen(port)
    return apolloServer
  } catch (e) {
    throw e;
  }
}
boot().then((server) => {
  console.log(`🚀 Server ready at http://localhost:3000${server.graphqlPath}`)
}).catch((error) => {
  console.log(`error : ${error}`)
})
위의 import 구문들은 필요한 모듈 및 우리가 작성한 코드를 import 하는것이니 별다를게없다. 두개만 본다.
import 'reflect-metadata'가 있는데 이녀석은 type-graphql 을 import 하기 전에 import 해준다.
그리고 dotenv 도 import 해주고 dotenv.config()함수를 호출해준다.
그리고 mongoose schema 등록 및 resolver build, server start등을 할 함수를 하나 선언한다.
이름은 boot라고 정했다.
boot에서는
mongoose.model('User', UserSchema)
  const db = await mongoose.connect(process.env.MONGOURL,
    {
      autoReconnect: true,
      useNewUrlParser: true,
    })
로 UserSchema로 model을 생성하고 mongoose connection을 연다.
  const resolvers = await buildSchema({
    resolvers: [UserResolver],
    scalarsMap: [{ type: ObjectId, scalar: ObjectIdScalar }],
  })
그리고 type-graphql로 작성한 resolver, scalar를 Apollo서버에서 사용가능한 스키마로 빌드한다.
  const apolloServer = new ApolloServer({
    schema: resolvers,
    playground: true,
    tracing: true,
  })
  apolloServer.applyMiddleware({ app })
  try {
    await app.listen(port)
    return apolloServer
  } catch (e) {
    throw e;
  }
앞에서 build한 결과인 resolvers를 ApolloServer의 생성자에 던져 주고 playground 와 tracing 옵션을 true로 준다.
그리고 express app을 applyMiddleware 함수로 전달하여 app에 포함된 미들웨어를 전달해준다.
최종적으로 app.listen 함수를 호출해주면 끝이다.
이제 이 boot 함수를 호출 해주면된다.
boot().then((server) => {
  console.log(`🚀 Server ready at http://localhost:3000${server.graphqlPath}`)
}).catch((error) => {
  console.log(`error : ${error}`)
})
graphqlPath는 applyMiddleware 에 path를 따로 전달 안했다면 default로 graphql로 세팅된다.
자 이제 콘솔에
npm run-script build
npm start
순으로 입력해서 실행해보자.
정상적으로 작성 했다면 콘솔창에 🚀 Server ready at http://localhost:3000/graphql이 뜰것이다.
playground에 아래 스크린샷 처럼 입력해보자.
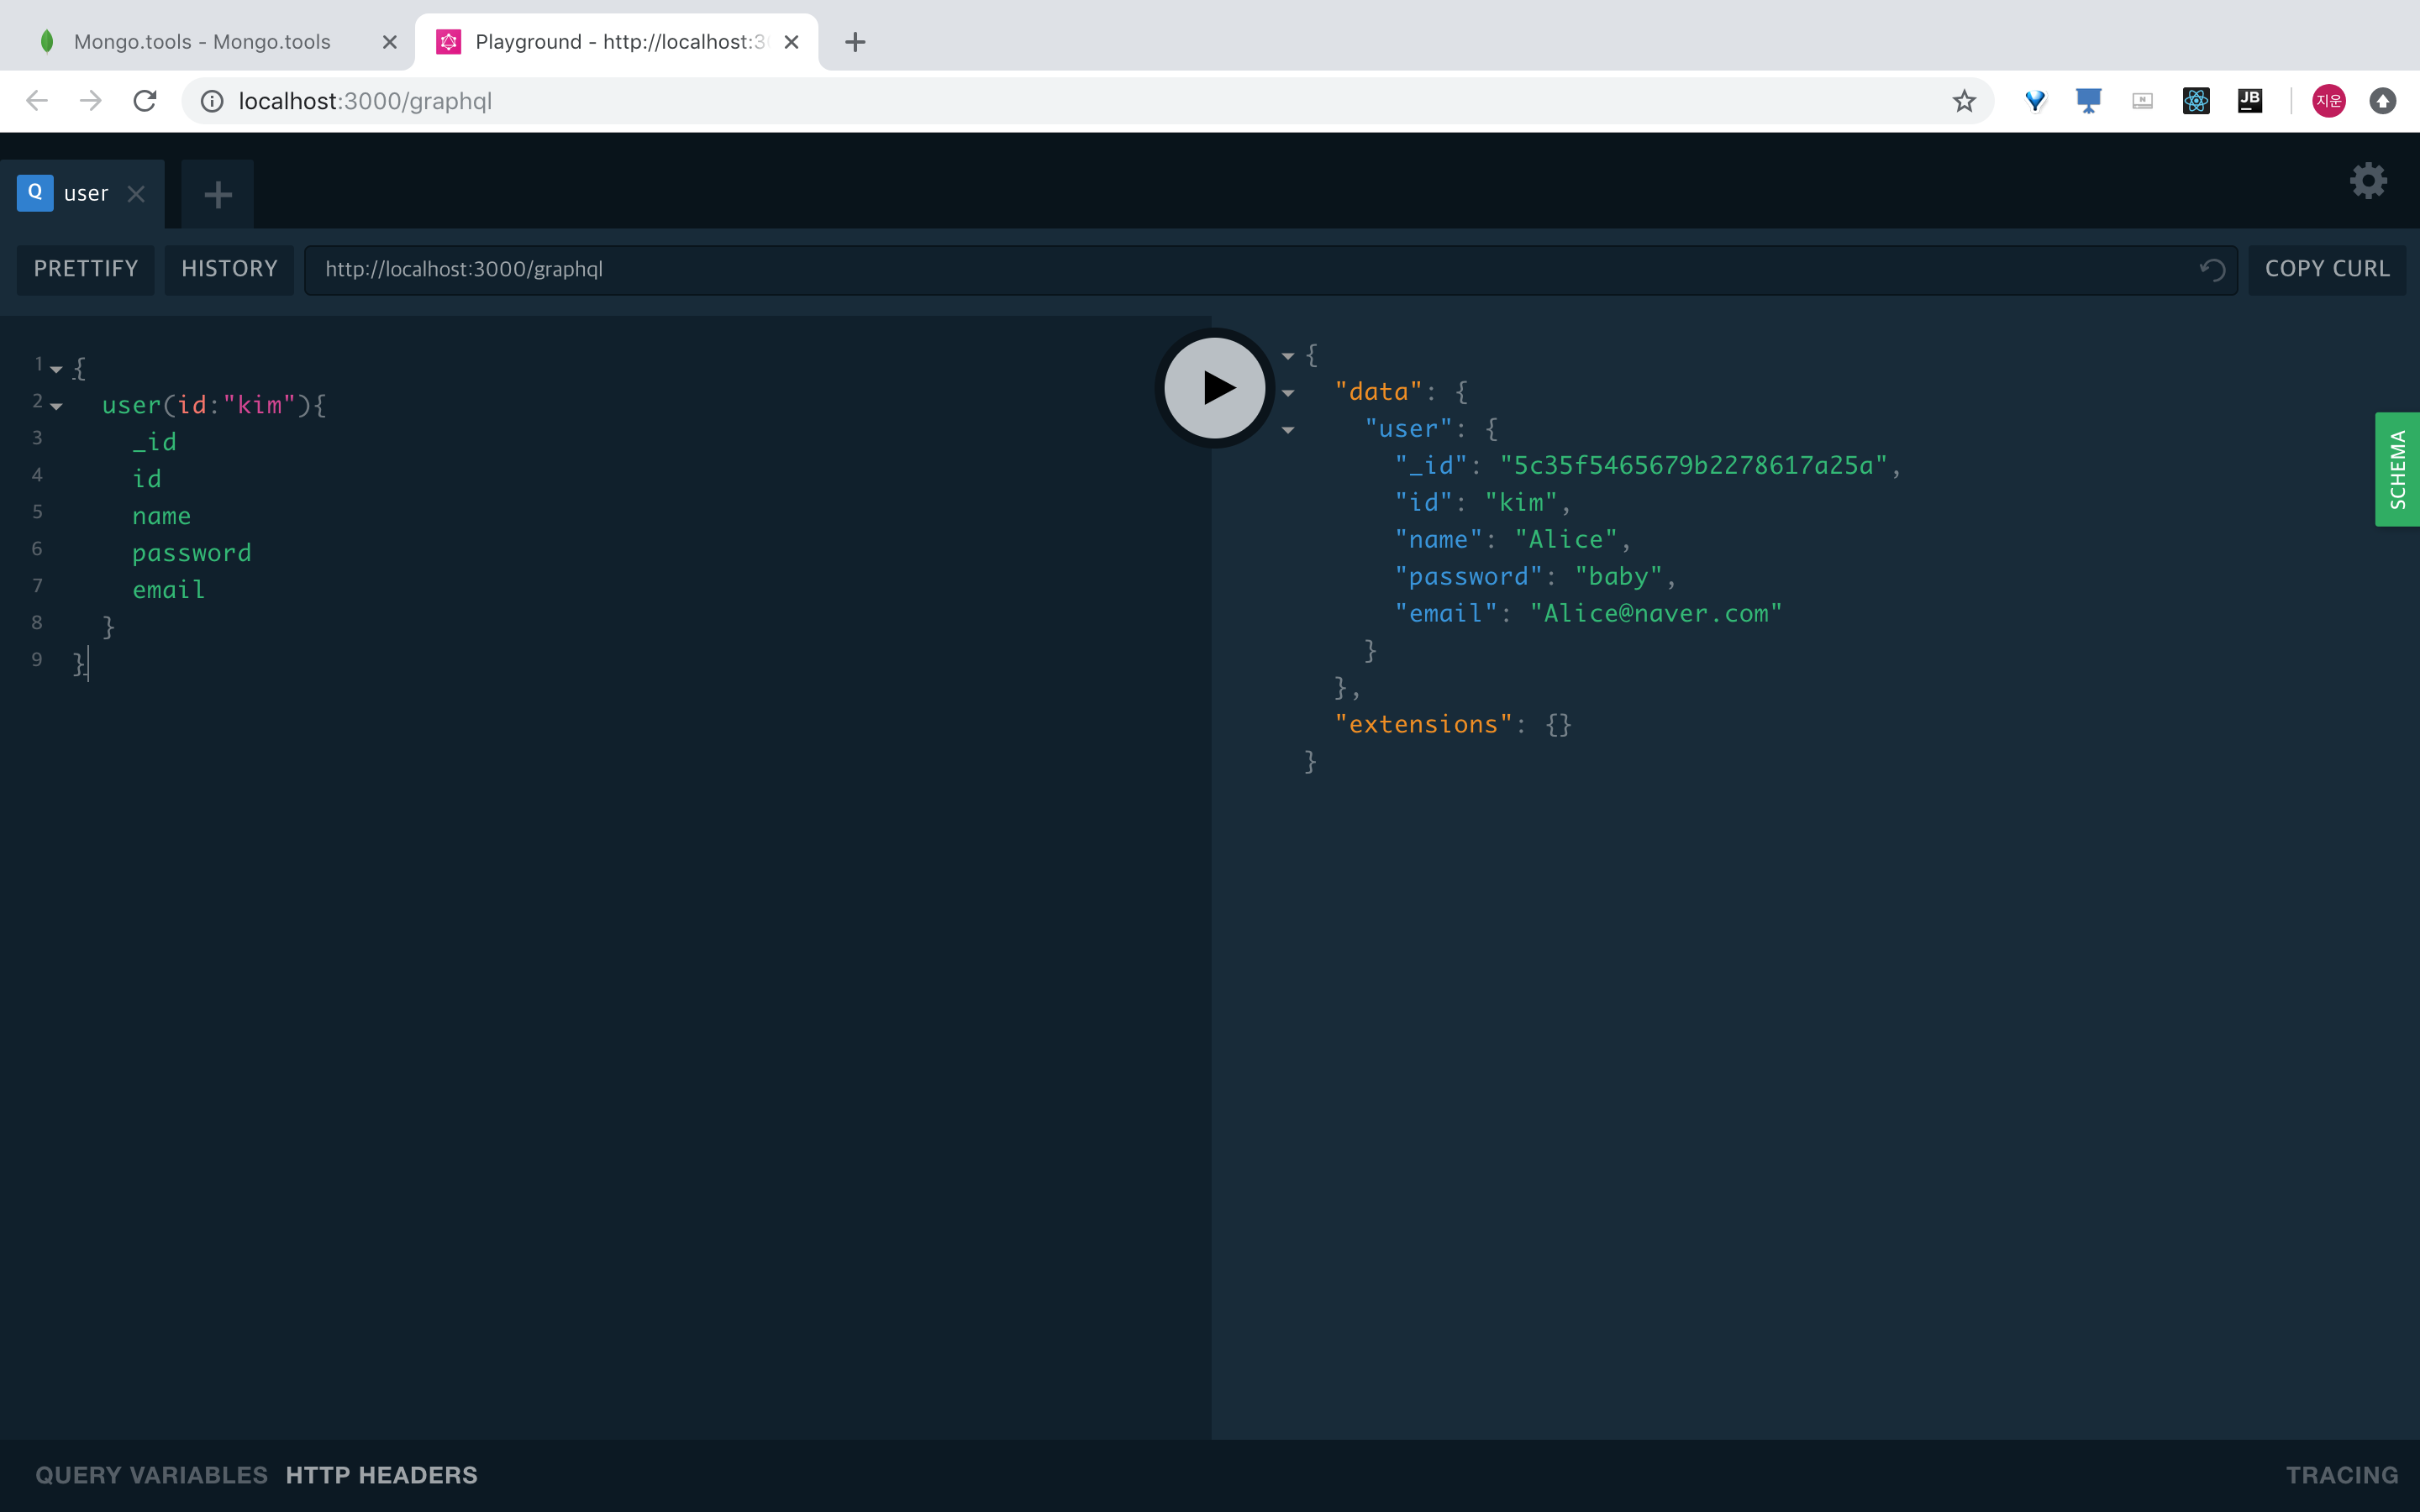
물론 여러분들은 null이 뜰것이다. 아직 signUp으로 user를 생성한게 없으니 말이다.
signUp까지만 해보도록 한다.
아래와 같이 playground 탭을 하나 더 생성해서 입력해본다.
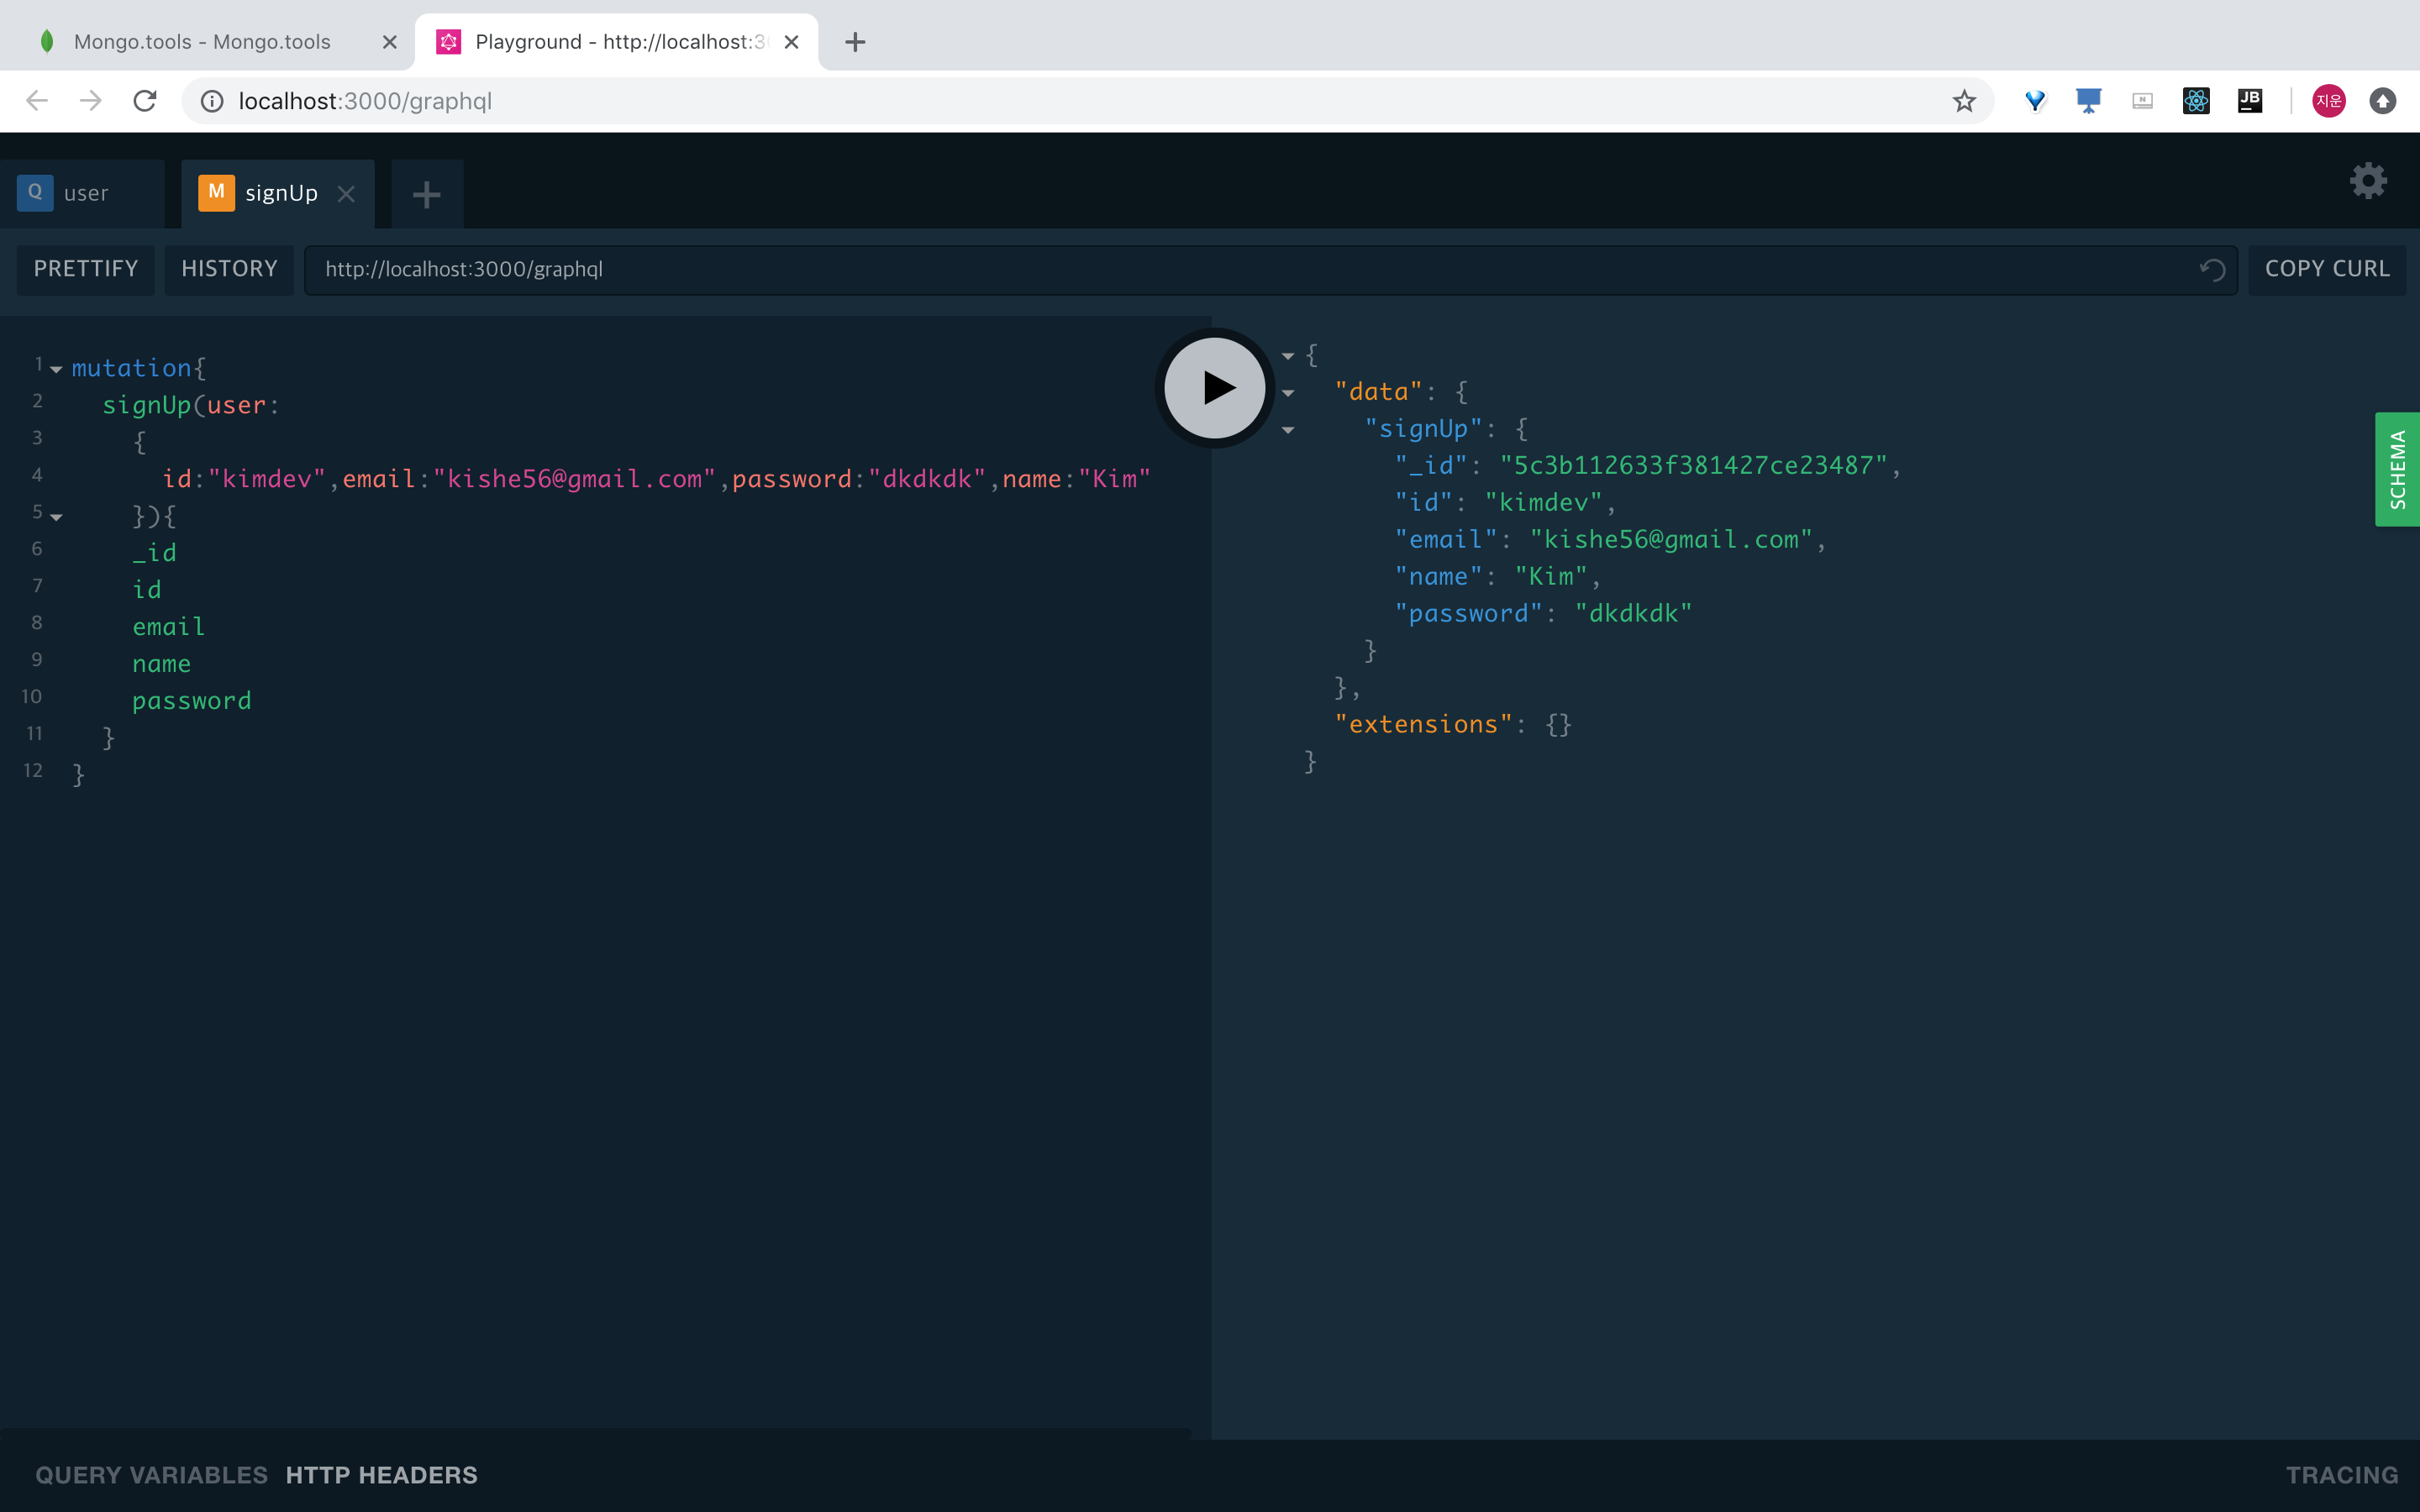
정상적으로 생성된걸 볼 수 있다.
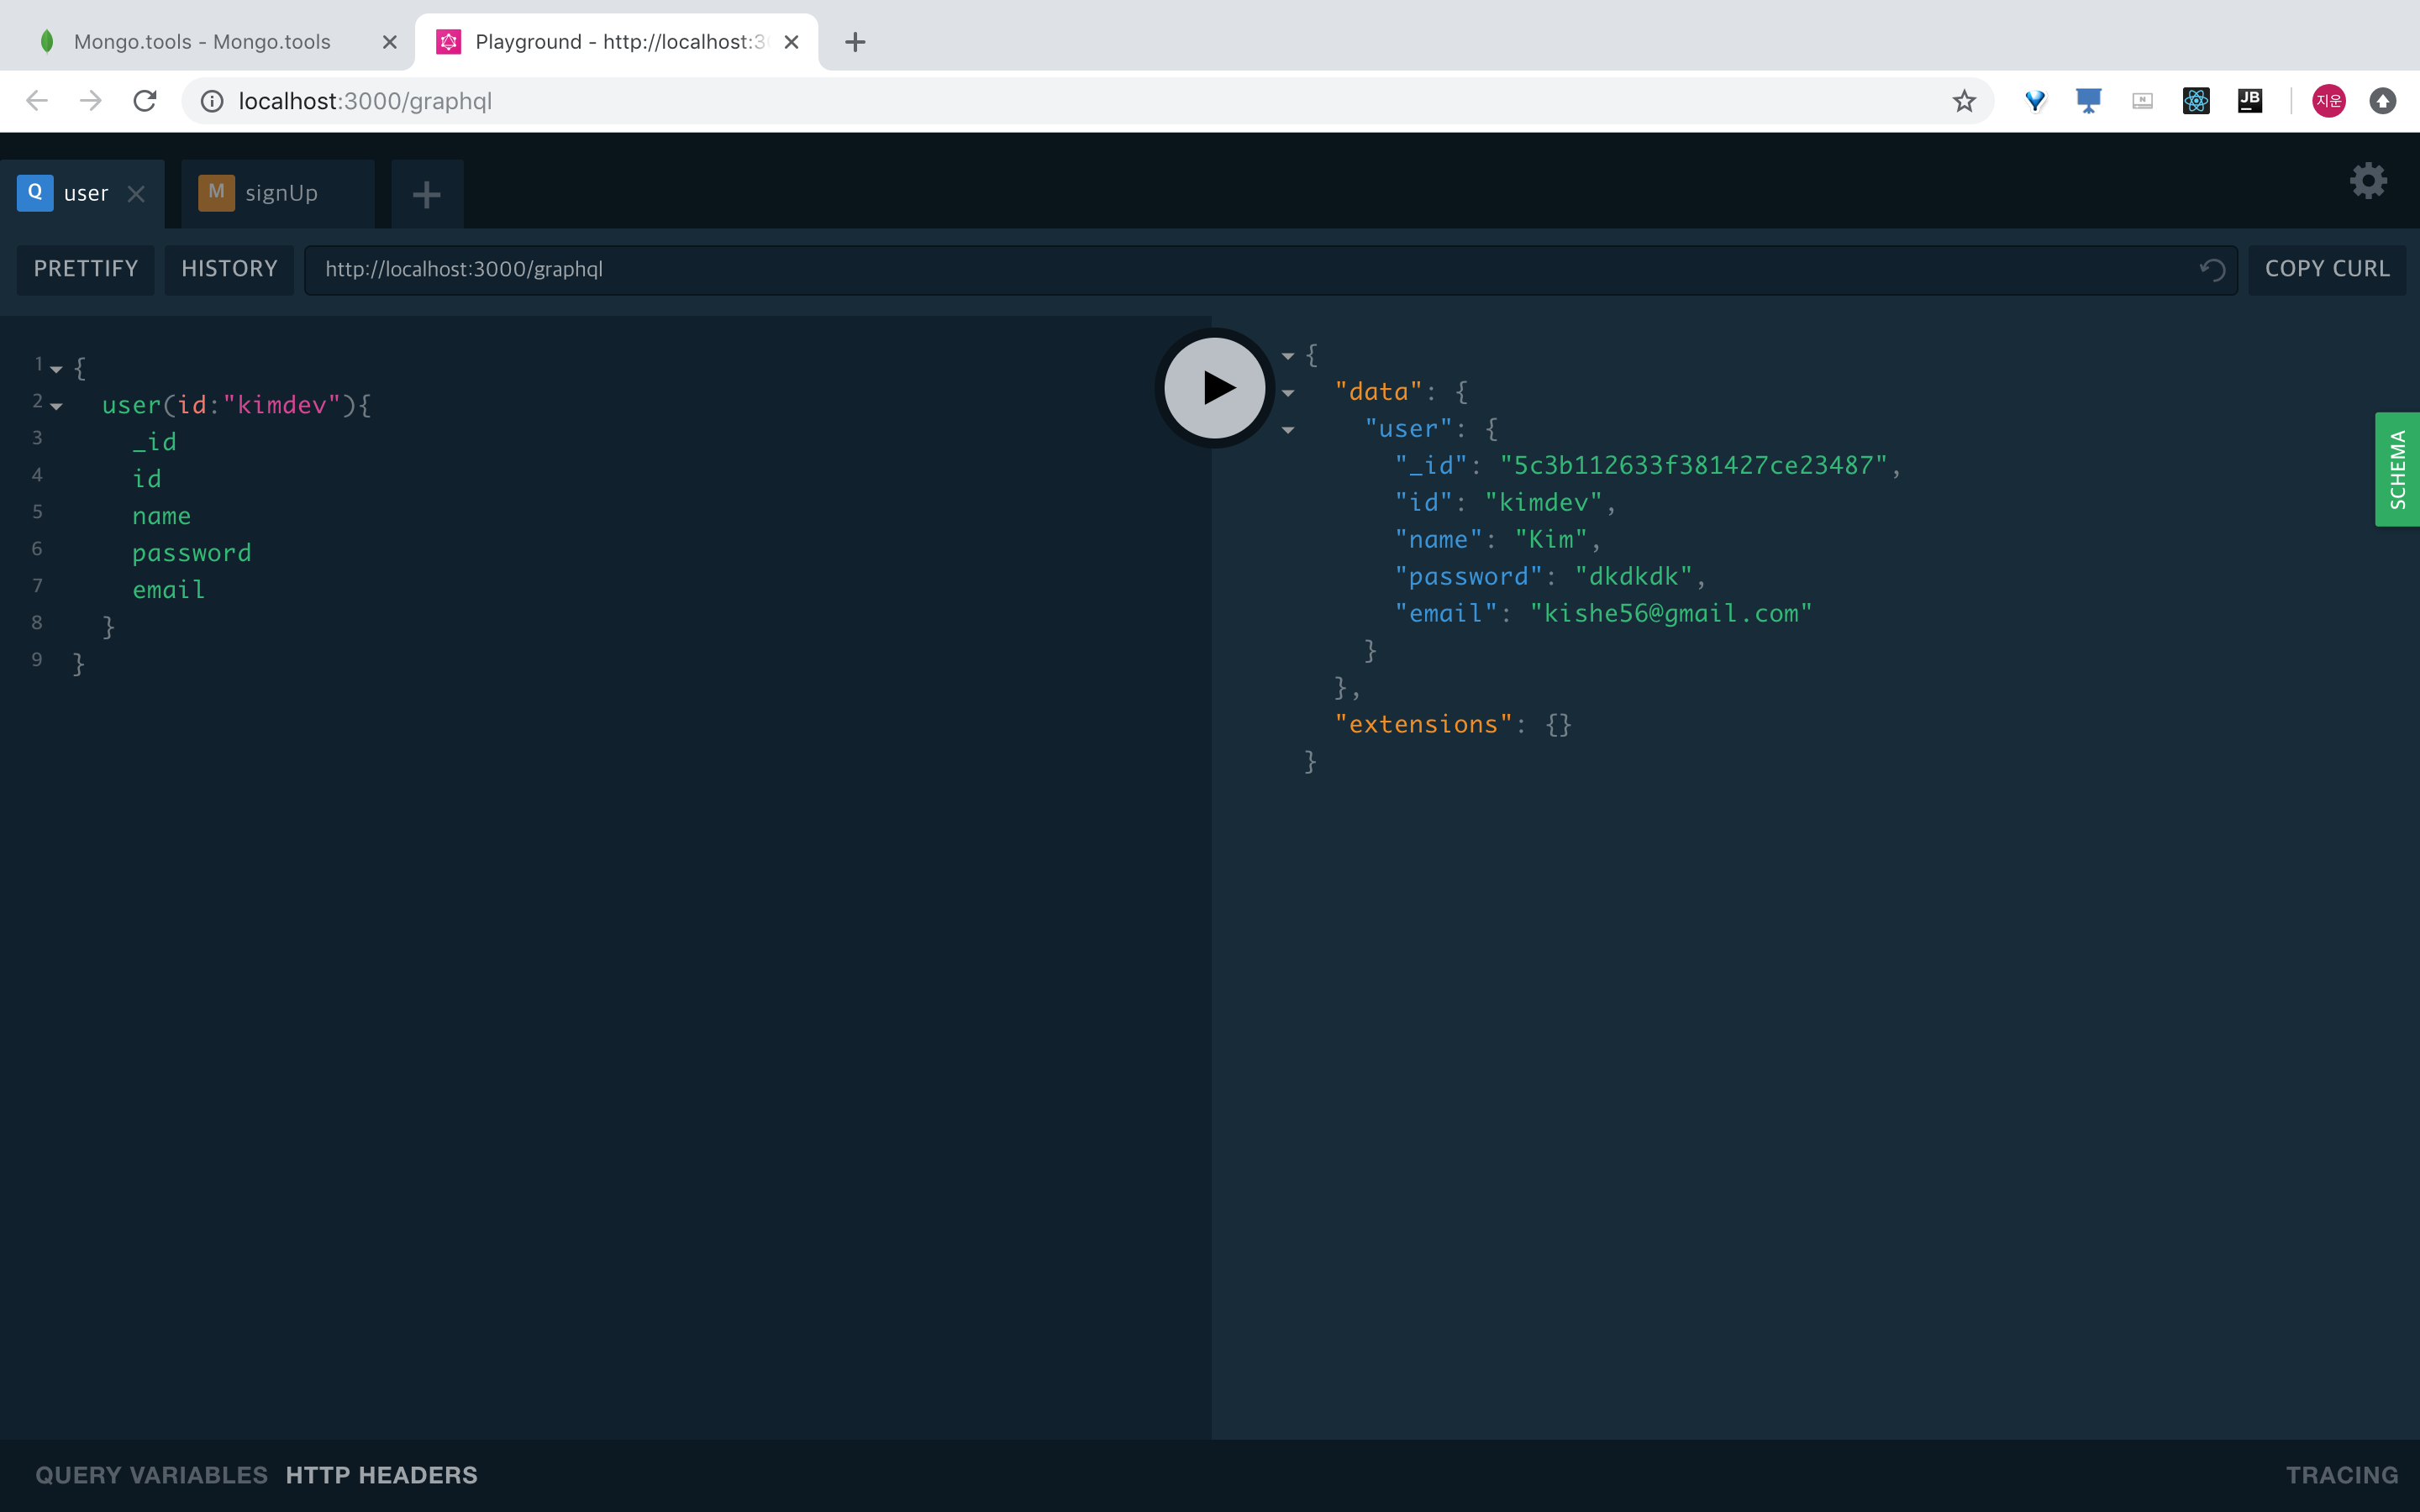
다시 user 쿼리 실행한 탭으로 넘어가서 생성한 id로 파라미터를 바꾸고 쿼리를 실행해보면 아래처럼 정상적으로 나오는걸 볼 수 있다.
sendEmail mutation도 실행해보고 질의 할 필드들도 변경 해보자.
주의 할점은 user 생성시 입력한 email로 실제 메일이 날라가니 본인 메일 주소를 입력하길 바란다.
타인에게 괜히 Hello world 날라가면 본인도 받는이도 스팸메일에 기분이 나쁘니 말이다…
이번 포스팅은 여기서 마무리 한다.
다음 포스팅에서는 이번 포스팅에서 작성한 코드에
- JWT 이용 인증
- 비밀번호 암호화
- validation 적용
- 인증 메일 템플릿 작성
에 대해서 추가 작성하도록 하겠다.
Subscribe via RSS